osCommerce
Introduction
Our osCommerce plug-in comes with regular updates and full integration support, offering a versatile out-of-the-box solution to accept online payments easily:
- Implements our latest core library, a standardised feature set reused across our integrations, to increase quality, enable robust monitoring, and shorten time to market.
- Supports Hosted Checkout Page/Hosted Tokenization Page integration method.
- Manages multiple stores.
- Accepts maintenance operations (refunds, cancellations or captures) directly from your osCommerce Back Office.
Find the complete list of payment methods the plugin supports in our payment methods overview.
Keep an eye on our Release Notes to stay informed about updates and new features (i.e. payment methods, features, integration methods) we have added to this plugin!
Check out our documentation to learn how to link your store with our platform to profit from all these features!
Download pluginDownload from GitHub repository
Konto erstellen
Um Transaktionen mit diesem Plugin zu verarbeiten, benötigen Sie ein Konto auf unserer Plattform.
Dieses Plugin funktioniert sowohl in unserer Test- als auch Live-Umgebung. Mit einem Testkonto können Sie sich mit dem Plugin und unserer Plattform vertraut machen. Wenn Sie dann live gehen möchten, erstellen Sie ein Produktionskonto oder kontaktieren uns.
Plugin code modifications void technical support
For security and stability, Worldline does not support plugins whose code has been modified by the merchant or a third party. Plugins are provided as-is (official version). Any unauthorised modification voids support and warranty and may cause malfunctions, security gaps, or incompatibilities with PSP updates.
Plugin installieren
Plugin installieren
The first step to use the plugin is the installation process. Before you proceed, make sure your infrastructure meets these system requirements:
| Item | Description |
|---|---|
| Plugin package | |
| GoPay credentials |
|
| Compatibility |
|
| PCI compliancy |
SAQ A |
Once done, follow these steps:
- Log in to the osCommerce shop backend and go to App Shop > Local storage.
- Select Upload.
- Upload the module from local storage and then select the green plus icon to deploy the application.
- Chose the platforms (sales channels) and click on "OK".
The plugin is now deployed and available in the list.
Plugin konfigurieren
After the installation, you need to configure the plugin to link your store to our platform.
Basic settings
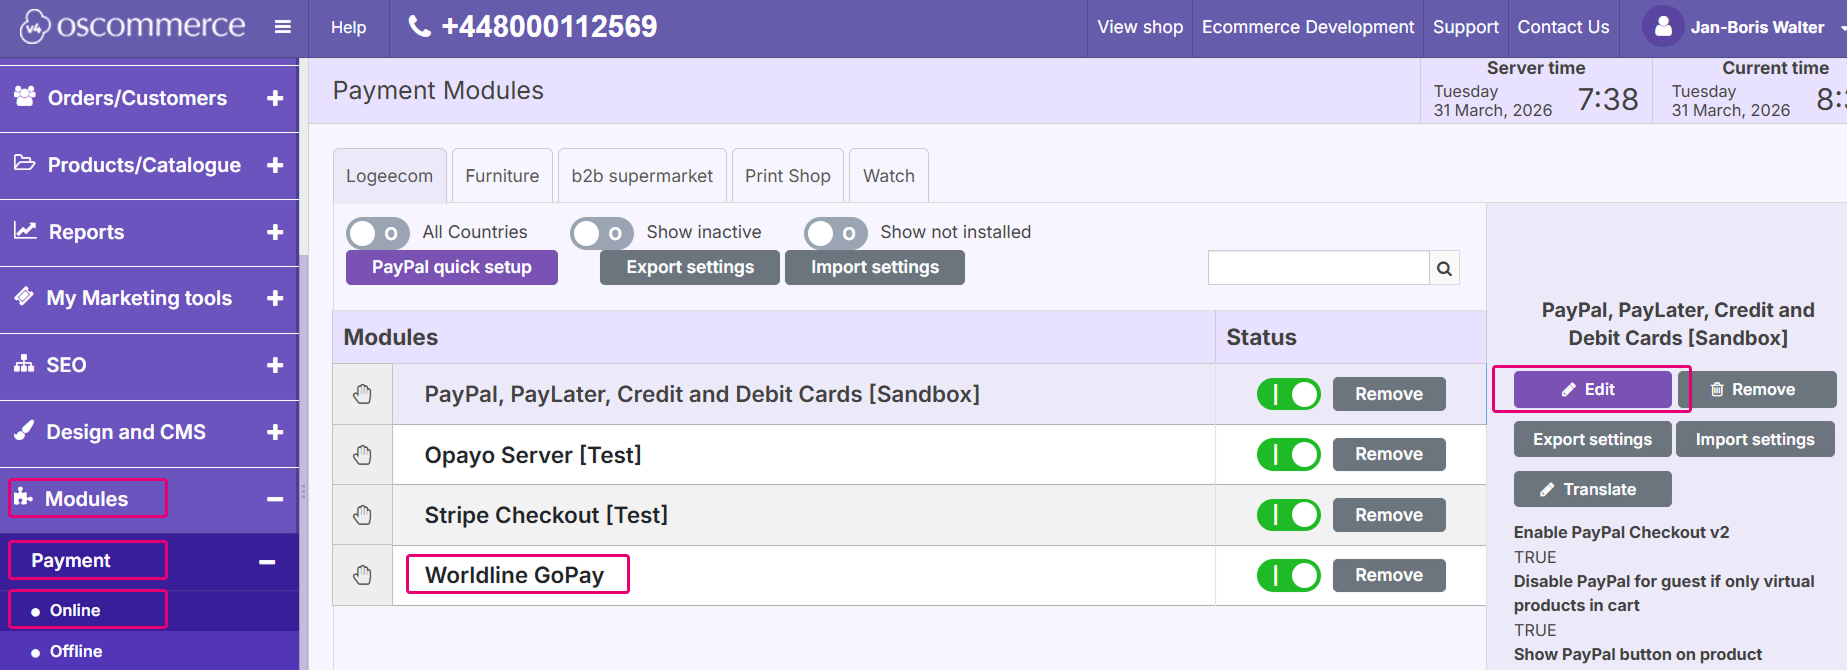
- Login to the osCommerce Back Office.
- Go to Modules > Payment > Online.
- Click on Worldline GoPay > Click on Edit in the right column.
- Configure the following settings:
| Property | Description |
|---|---|
| Environment |
Select between "Test" or "Production" to link your shop to the respective environment. Depending on your selection, the shop module will send the transaction requests to the test or production environment. Make sure to
|
| PSPID | Enter your test/live PSPID from our platform that you want to use for transaction processing |
| API key | Enter the API Key of your test/live PSPID. Read our dedicated guide to learn how to generate one. |
| API secret | Enter the API Secret of your test/live PSPID. Read our dedicated guide to learn how to generate one. |
| Webhooks key | Enter the webhooks Key of your test/live PSPID from the Merchant Portal as described in our dedicated guide. |
| Webhooks secret | Enter the webhooks Secret of your test/live PSPID from the Merchant Portal as described in our dedicated guide. |
| Webhooks URL | Copy this URL into the Endpoint URLs fields in your account as described in our dedicated guide. |
Click on "Connect" to confirm your settings.
Test connection
Once you have filled in the data from the table, a built-in connection validation between the plugin and our platform will take place.
If the API Key/Secret throws an error, the plugin will not save the data. Contact your system administrator for troubleshooting and verify:
- You are using the correct credentials.
- Whether your PSPID is active.
- You are sending the request to the correct PSPID/environment (Test vs Production).
If the API Key/Secret are correct, the plugin will save the data.
Payment methods
Once you have configured the basic settings, you can configure the global settings of your osCommerce application.
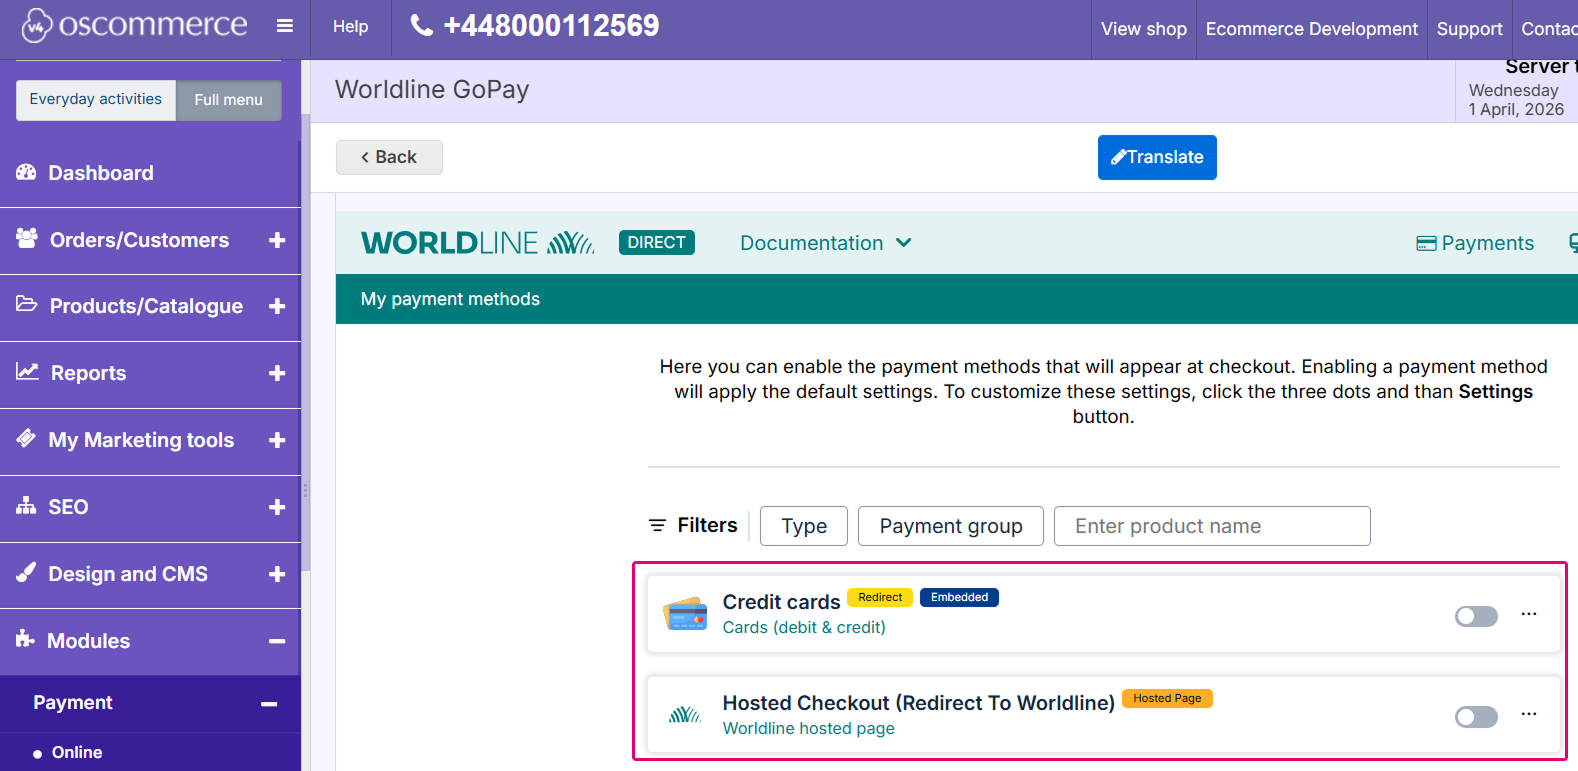
- Go to the "Payment” tab to configure the different payment methods available on the checkout page of your osCommerce website.
- Enable/disable payment methods to show/hide them from the checkout page.
- Click on the three dots "..." and click on "Settings".
We have preserved the settings that are natively available for specific gateways. Refer to the osCommerce specific documentation to learn more.
If you enable a payment method that is not active in your Worldline account, all payment requests will be declined.
The plugin offers three options:
- Credit Cards: Your customers stay on your checkout page while entering their card details in an iframe hosted on our server. Alternatively, the checkout pages renders a button that will redirect your customer to a dedicated card form on our payment page.
- Hosted Checkout (Redirect to Worldline): Your customers confirm the order in your webshop checkout page. The plugin then redirects your customers to our Hosted Checkout Page to allow them selecting their preferred payment method.
- Single payment button: Your customers select their preferred payment method in your webshop and confirm the order. The plugin then redirects your customers either:
- To a version of our Hosted Checkout Page that is branded according to the selected payment method.
- The third party provider offering the selected payment method.
General settings
| Property | Description |
|---|---|
| Enable on checkout |
Enables or disables the payment method on the checkout page. |
| Checkout name |
Define the payment method name that will be displayed on the checkout page. Translation are available in all supported storefront languages. |
| Template name |
Enter the file name of your template to adapt our payment page to the look and feel of your shop. To learn how to create templates, see our dedicated chapters in the Hosted Checkout Page guide. |
| Payment action (Only available if the payment method supports authorisation) |
Define whether to process the transactions as authorisation mode or as direct sale. Select one of the following options:
If you select "Authorized", also configure the following:
If transaction type is set to "Authorized", beware of the following:
|
| Automatic capture |
Define when to automatically capture authorised transactions. You can schedule the capture up to 5 days after authorisation. |
| Number of payment attempts |
Define the number of retry attempts for unsuccessful payments on the Hosted Checkout Page. You can configure up to 10 allowed attempts. Any attempt of payment after that will automatically be refused. |
| Apply surcharge |
In some regions, you may apply a surcharge on credit card transactions. If enabled, our platform will automatically apply a surcharge. If your account is not configured to accept surcharging, all your transactions will be blocked. |
| Status mapping |
You can also configure different statuses for your order depending of the payment status:
Modify this mapping only if you are completely aware of how the order status flow works in your shop. |
| Debug mode |
Enable this feature to log all outgoing API calls and all incoming responses from the Worldline API. |
| Logging records lifetime |
Defines how long your systems retain logs (default value: 10 days). We recommend keeping this value when you expect high traffic to ensure stable performance. |
| Enable Pay By Link |
Create payment links via our PaymentLinks API which you can share via SMS or e-mail. You can use payment links to
|
| Pay by Link title |
Define the name of the Pay By Link payment method in the shop Back Office. |
| Default expiration |
Define how long a payment link remains active (default value: 7 days). Allowed range: 24hrs to 6 months. |
| Disconnect |
Removes all plugin settings and redirects you to the user authorisation page, allowing you to connect a different account. |
3-D Secure settings
Only available for Credit cards, Hosted Checkout and Google Pay.
| Property | Description |
|---|---|
| Enable 3-D secure authentication |
Define whether to enforce Strong Customer Authentication. We strongly recommend enabling, as 3-D Secure is mandatory in some markets. This will also ensure liability shifts for transactions with successful 3-D Secure authentication. If you disable this option, you may not benefit from liability shifts and may be held liable. |
| Enforce strong customer authentication for every payment |
Define whether to enforce Strong Customer Authentication, regardless of any possible applicable exemptions. |
| Enable 3DS exemption |
Some markets allow you to potentially exempt your customers from a 3-D Secure check. Define whether to request exemptions when the criteria are met. A customer can receive up to five consecutive exemptions, with a cumulative total of EUR 150. The next transaction that exceeds these criteria will require Strong Customer Authentication (SCA). |
Credit card specific settings
| Property | Description |
|---|---|
| Vault title |
Customise the radio button text displayed on the checkout page when a customer is presented a card that has previously been saved. |
| Type |
Defines the payment flow for credit card payments.
|
| Group credit cards (available for Hosted Checkout and Credit cards) |
Enable/Disable the Hosted Checkout Page "Group cards" feature.
If you configure this in the "Credit cards" payment method, we advise to enable grouping the cards. |
Hosted Checkout specific settings
| Property | Description |
|---|---|
| Upload an image |
Your company logo appearing in the header of the Hosted Checkout Page. Allowed formats: png |
Other payment methods specific settings
| Property | Description |
|---|---|
| Session Timeout |
Define the session timeout duration on the Hosted Checkout Page in minutes. |
| Product ID |
Define the specific brand for the Intersolve payment method. Find all possible values in the "Integration" chapter in the Intersolve guide. If undefined, the default value is 5700. |
| Instant payment only |
Define whether to accept only instant transfers for Bank Transfer by Worldline payments. |
Click on "Save" to confirm your settings.
Monitoring
Our plugin includes a built in logging system. When debug mode is enabled, you can view logs for all transactions. The logs appear on two screens:
- Webhooks: Logs all incoming webhooks received from our platform, informing you about transaction status changes. Each webhook is a separate line in the grid.
- Logs: All requests/responses sent/receive from the plugin to/from the GoPay API, grouped per transaction.
Manage payments
We have designed the plugin to follow-up on your orders automatically and autonomously, freeing you from the administration involved. Learn here how to use our plugin effectively to make your business thrive!
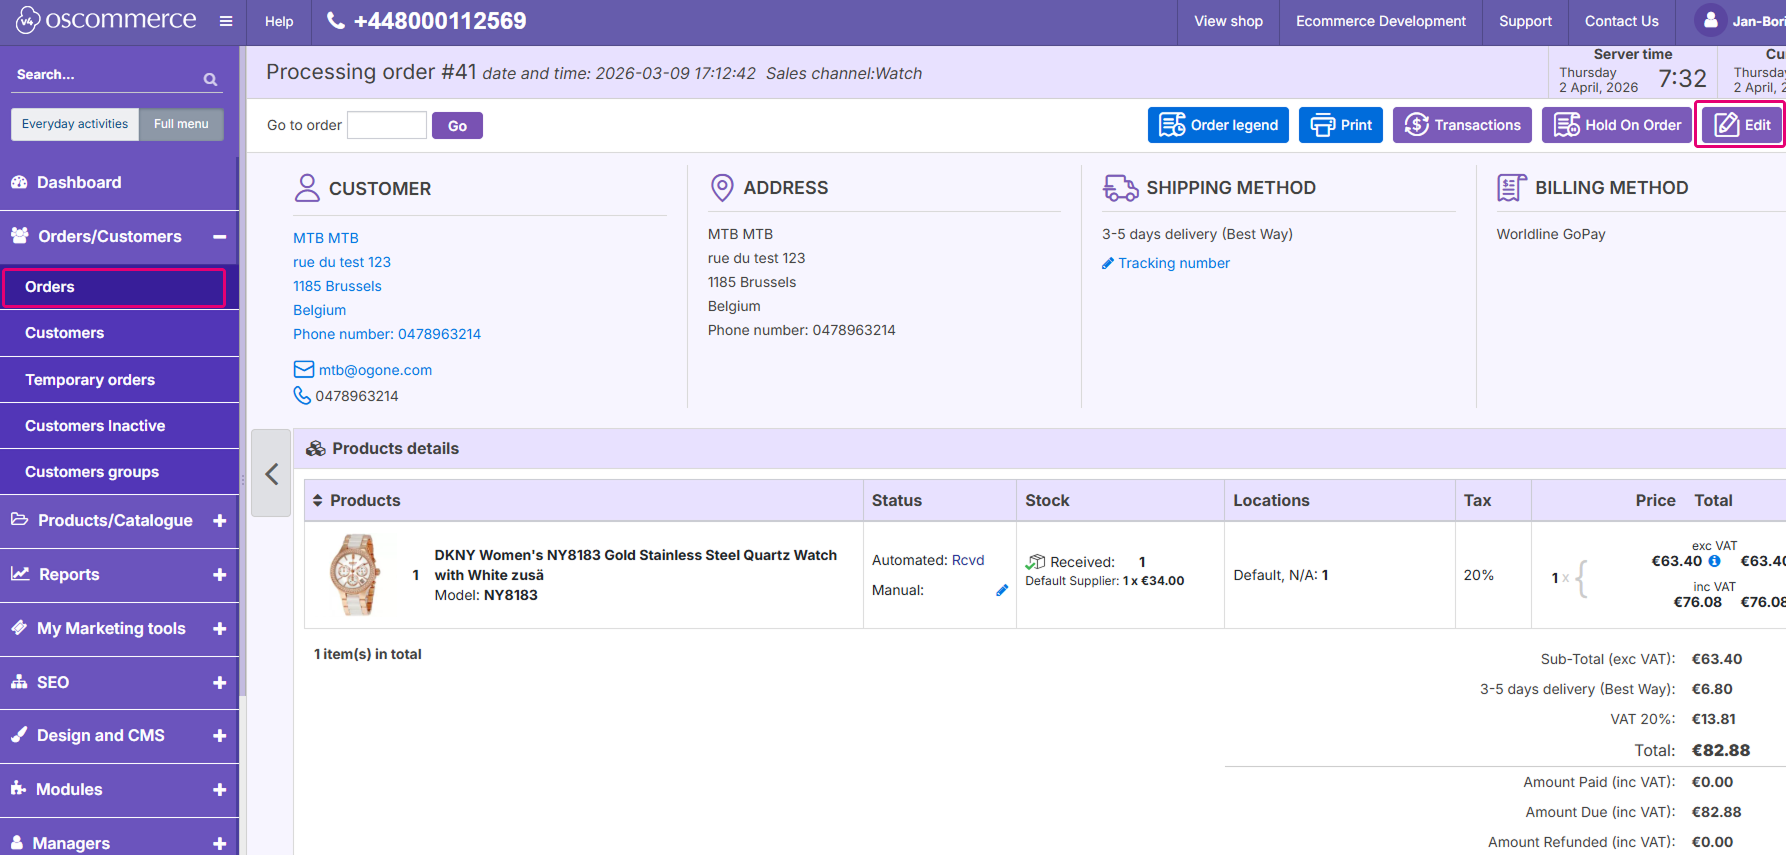
Perform maintenance operations
Captures, refunds and cancellations of authorisations are standard processes (also known as maintenance operations) in your everyday business logic. Learn here how to perform these operations in the osCommerce Back Office:
- Login to the osCommerce Back Office. Go to Order/Customer > Orders to view your order. Click on Process order.
- Click on the Transactions button to view the payment details.
- All allowed actions are displayed in the Action column.
Perform test transactions
Use our platform's test environment to make sure your plugin works as intended. We offer test data sets on our dedicated Testszenarios page. Target our test environment as described in the "Configure Plugin" section.
Sorgen Sie dafür, auf die LIVE-Umgebung zu wechseln, sobald Sie Ihre Tests abgeschlossen haben.
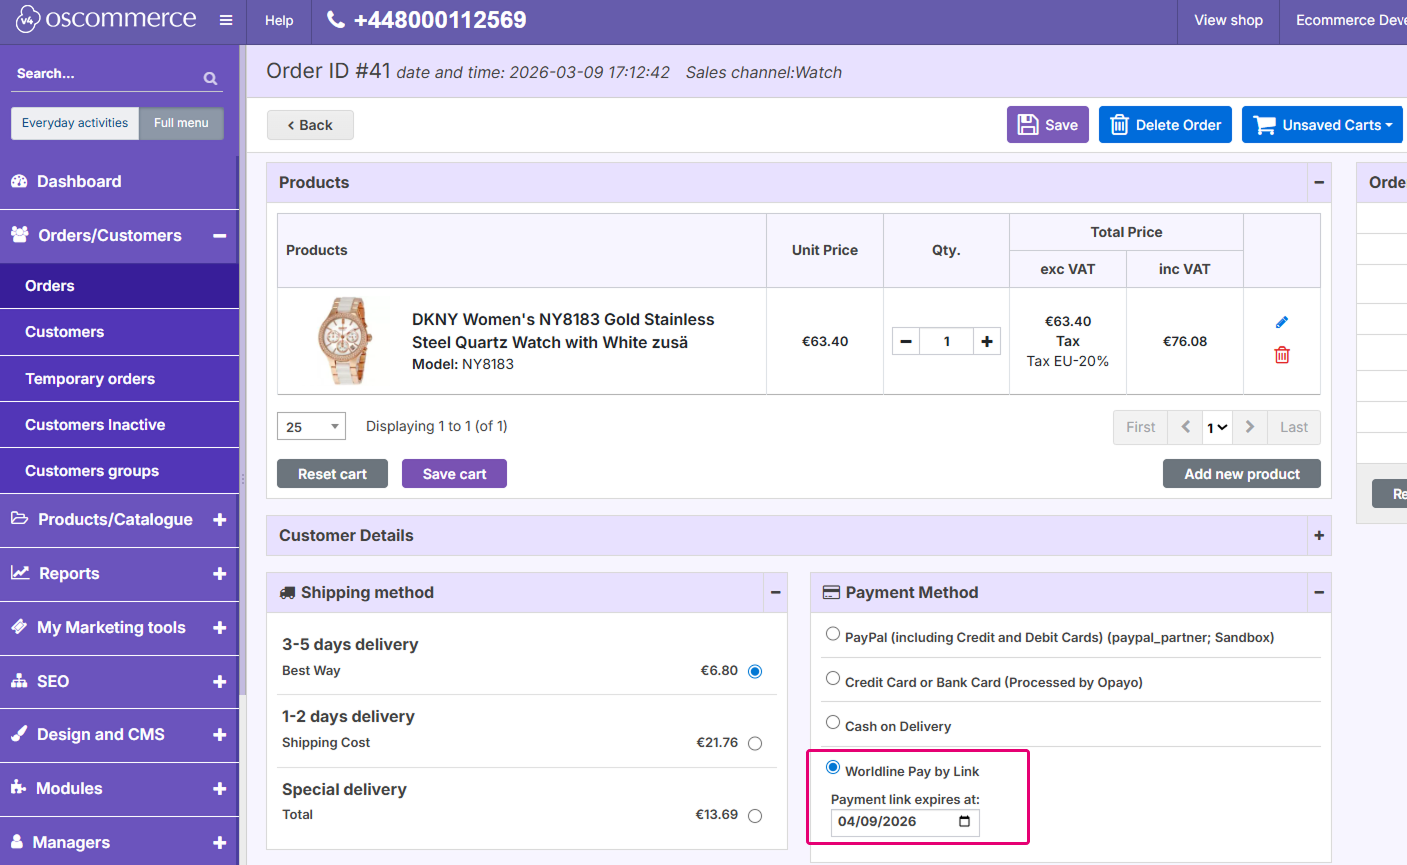
Usage of Pay by Link
This feature allows you to create payment links via our PaymentLinks API which you can share via SMS or e-mail. You can use payment links to
- Allow customers to complete their payment for already shipped orders/abandoned cart orders.
- Create a new order in osCommerce Back Office.
To do so, follow these steps:
- Go to the order and scroll to the Payment Method section.
- Select Worldline Pay by Link and select the expiration data.
- Click on Save to create the shareable link.
Usage of Mealvouchers
Our plugin supports the Mealvouchers payment method. To make it available, you must mark it as eligible accordingly. To flag the products, you can simply edit each product individually in osCommerce.
To do so, follow these steps:
- Go to the edition page of the product you wish to configure
- Click on the Modules menu.
- Choose between three different values:
Food and Drink
Home and Garden
Gifts and Flowers
Refer to our Mealvouchers documentation to learn more about those product types.