SAP Commerce Cloud
Einführung
Unser SAP Commerce Cloud Plugin bietet regelmäßige Updates und einen vollständigen Integrationssupport. So verfügen Sie über eine flexible, außergewöhnliche Lösung für die reibungslose Annahme von Online-Zahlungen:
- Unterstützt sowohl Hosted Checkout Page als auch Integrationsmodus Hosted Tokenization Page
Find the complete list of payment methods the plugin supports in our payment methods overview.
- Verwaltet mehrere Stores
- Akzeptiert Zahlungsvorgänge (Gutschriften, Autorisierungen, Erfassungen usw.) direkt von Ihrem SAP Commerce Cloud Backoffice
Beachten Sie unser Änderungsprotokoll, um über Updates und neue Funktionen auf dem Laufenden zu bleiben (z.B. Zahlungsmethoden, Features, Integrationsmodi), die wir diesem Plugin hinzugefügt haben.
Schauen Sie sich unsere Dokumentation an, um zu erfahren, wie Sie Ihren Store direkt mit unserer Plattform verbinden können.
Plugin herunterladen Download from GitHub- Beauftragen Sie einen Systemadministrator mit der Installation und Konfiguration des Plugin.
- Deshalb sind die Zielgruppe dieser Dokumentation Systemadministratoren mit einer gründlichen Kenntnis von SAP Commerce Cloud / Hybris
Konto erstellen
Um Transaktionen mit diesem Plugin zu verarbeiten, benötigen Sie ein Konto auf unserer Plattform.
Dieses Plugin funktioniert sowohl in unserer Test- als auch Live-Umgebung. Mit einem Testkonto können Sie sich mit dem Plugin und unserer Plattform vertraut machen. Wenn Sie dann live gehen möchten, erstellen Sie ein Produktionskonto oder kontaktieren uns.
Plugin code modifications void technical support
For security and stability, Worldline does not support plugins whose code has been modified by the merchant or a third party. Plugins are provided as-is (official version). Any unauthorised modification voids support and warranty and may cause malfunctions, security gaps, or incompatibilities with PSP updates.
Plugin installieren
Install plugin
Plugin installieren
Der erste Schritt zur Nutzung des Plugin ist die Installation. Vorab sollten Sie sicherstellen, dass Ihre Infrastruktur die folgenden Systemanforderungen erfüllt:
| Element | Beschreibung |
|---|---|
| Plugin-Paket | |
| GoPay Anmeldedaten |
|
| Java |
Mindestens Version 11, OpenJDK 11 wird empfohlen Das Merkmal JAVA_HOME muss an der richtigen Stelle positioniert sein, damit der Installierer korrekt arbeiten kann. |
| SAP Commerce |
Offiziell unterstützte Versionen von SAP Commerce Cloud sind:
Andere Patch-Versionen von 2105 und 2011 sind kompatibel mit diesem Plugin. Aber das Plugin wurde für andere Versionen nicht getestet. |
| Komponenten von SAP Commerce |
Die Referenz-Storefrontimplementierung funktioniert mit dem Apparel Accelerator. Die Nutzung mit dem B2B Accelerator, Electronics Accelerator oder sonstigen wird nicht offiziell unterstützt. Aber es sind Backend-Dienste vorhanden, die dies ermöglichen. Wenn Sie Ihr System bereits grundlegend an Ihre Bedürfnisse angepasst haben, könnte eine zusätzliche Integration erforderlich sein, denn dieses System arbeitet mit der Standard-Accelerator-UI. |
| Entwicklungsumgebung |
Die Beispiele in diesem Dokument arbeiten mit einer UNIX-basierten Entwicklungsumgebung (z.B. Mac OS X oder Linux). Bei Installationen mit Windows nutzen Sie die entsprechenden Windows-Befehle (z.B. setantenv.bat, hybrisserver.bat). |
| Einhaltung von PCI |
SAQ A |
Zusätzlich zu diesen Voraussetzungen sollten Sie die Erweiterungsstruktur berücksichtigen:
| Merkmal | Beschreibung |
|---|---|
| worldlinedirectb2ccheckoutaddon | Enthält die Änderungen an Storefront, die erforderlich sind, um die Zahlungsvorgänge über Worldline Online Payments Direct in die B2C Apparel Storefront Checkout Journey zu integrieren. |
| worldlinedirectbackoffice | Enthält Änderungen am Backoffice, um die Konfiguration des Plugin zu erleichtern. |
| worldlinedirectcore | Enthält alle Zusätze zum Datenmodell und funktionale Dienste, die unsere REST API verwenden. Enthält auch das Java SDK. |
| worldlinedirectcustomersupportbackoffice | Enthält Abänderungen an der Perspektive des Customer Support Backoffice, die es einem Customer Support Agenten erlaubt, eine Transaktion manuell zu erfassen oder gutzuschreiben. |
| worldlinedirectfulfillmentprocess | Enthält Abänderungen am Verfahren der Auftragsabwicklung von Out of the Box SAP Commerce. Damit können Sie kontrollieren, ob das System mit der Auslieferung der Güter/Dienste an Ihre Kunden wartet, bis dass eine Transaktion autorisiert/erfasst ist. |
| worldlinedirectocc | Enthält Erweiterungen der Omni Commerce Connect REST APIs, die in SAP Commerce enthalten sind: Sie können Zahlungen von einer Storefront oder einer mobilen App aus verarbeiten. |
| worldlinedirectwebhook | Enthält einen Endpunkt für die Aktualisierungen von Transaktionsstatus von unserer Plattform via Webhooks. |
- ein brandneues Projekt mit einem Standard
- Out of the Box Accelerator Storefront
- ein bestehendes Projekt mit eigener Storefronterweiterung basierend auf yacceleratorstorefront.
Danach führen Sie die folgenden Schritte aus:
Installieren Sie SAP Commerce mit „cx“ Recipe
SAP bietet im SAP Help Portal Anweisungen, wie die Installationsrezepte zu nutzen sind. Wenn Sie mit der Installation noch nicht vertraut sind, sollten Sie diese vorher lesen.
- Laden Sie SAP Commerce im .Zip-Format herunter. Dekomprimieren Sie die Plattform und navigieren Sie zum Verzeichnis „Installer“.
- Führen Sie den folgenden Befehl aus. Ersetzen Sie „your_password“ mit dem erwünschten Administratorpasswort für das System:
./install.sh -r cx -A local_property:initialpassword.admin=your_password- Führen Sie die folgenden Schritte aus, um das System zu erstellen und zu initialisieren:
./install.sh -r cx initialize -A local_property:initialpassword.admin=your_password- Erweitern Sie die Codebasis
Die Datei herunterladen und dekomprimieren - Bestätigen Sie, dass Sie die folgende Verzeichnisstruktur erhalten haben:
hybris/
           config/
           bin/
                       custom/
                                     worldline/
- Das Konfigurationsverzeichnis enthält ein Musterset mit Konfigurationen in der Datei local.properties. Kopieren Sie diese Konfigurationen in die Datei local.properties, die nach der Installation von SAP Commerce generiert wurde
- Das Konfigurationsverzeichnis enthält auch eine Datei localextensions.xml. Fügen Sie Folgendes aus dieser Datei Ihrer eigenen Datei localextensions.xml hinzu, die Sie nach der Installation von SAP Commerce generiert haben:
<!-- WORLDLINE -->
<extension dir="${HYBRIS_BIN_DIR}/custom/worldline/worldlinedirectcore"/>
You will require an existing installation of SAP Commerce in order to be able to use the Worldline Direct
plugin. If you already have an installation of SAP Commerce with the B2C Accelerator and its
corresponding extensions included, you can skip this step.
Worldline – SAP Commerce Cloud Documentation
Technical Documentation – 9
<extension dir="${HYBRIS_BIN_DIR}/custom/worldline/
worldlinedirectb2ccheckoutaddon"/>
<extension dir="${HYBRIS_BIN_DIR}/custom/worldline/worldlinedirectbackoffice"/>
<extension dir="${HYBRIS_BIN_DIR}/custom/worldline/worldlinedirectocc"/>
<extension dir="${HYBRIS_BIN_DIR}/custom/worldline/worldlinedirectwebhook"/>
<extension dir="${HYBRIS_BIN_DIR}/custom/worldline/
worldlinedirectcustomersupportbackoffice"/>
<extension dir="${HYBRIS_BIN_DIR}/custom/worldline/
worldlinedirectfulfilmentprocess"/>
- Das Verzeichnis bin/custom/worldline enthält alle erforderlichen Erweiterungen. Kopieren Sie sie in Ihr eigenes Verzeichnis hybris/bin/custom/worldline. Wenn Sie diese Erweiterungen in ein anderes Verzeichnis kopieren möchten, aktualisieren Sie Ihr localextensions.xml entsprechend.
Storefront erweitern
- Sie müssen möglicherweise den folgenden Befehl ausführen, um sicherzustellen, dass die richtigen Addons in Ihrem Storefront verfügbar sind:
   ant addoninstall

-Daddonnames=

"adaptivesearchsamplesaddon,assistedservicecustomerinterestsaddon,assistedserviceprom

otionaddon,assistedservicestorefront,assistedserviceyprofileaddon,captchaaddon,config

urablebundleaddon,consignmenttrackingaddon,customercouponaddon,customercouponsamplesa

ddon,customerinterestsaddon,customerticketingaddon,eventtrackingwsaddon,merchandising

addon,merchandisingstorefrontsampledataaddon,multicountrysampledataaddon,notification

addon,ordermanagementaddon,orderselfserviceaddon,pcmbackofficesamplesaddon,personaliz

ationaddon,personalizationsampledataaddon,personalizationyprofilesampledataaddon,prof

iletagaddon,selectivecartsplitlistaddon,smarteditaddon,stocknotificationaddon,textfie

ldconfiguratortemplateaddon,timedaccesspromotionengineaddon,timedaccesspromotionengin

esamplesaddon,xyformssamples,xyformsstorefrontcommons,ysapproductconfigaddon"

-DaddonStorefront.yacceleratorstorefront="<YOUR-STOREFRONT>"
Ersetzen Sie <YOUR-STOREFRONT> mit dem Namen der Erweiterung Ihres Storefront, z.B. yacceleratorstorefront oder <project>storefront.
- Installieren Sie das Addon mit dem folgenden Befehl in Storefront:
ant addoninstall -Daddonnames="worldlinedirectb2ccheckoutaddon"
-DaddonStorefront.yacceleratorstorefront="<YOUR-STOREFRONT>"<your-storefront></your-storefront>"- Nun bauen Sie Ihr System um:
ant clean all- Nun entweder initialisieren oder das System aktualisieren. Sie können beides über die Hybris Administration Console (HAC) unter https://<your-server>:9002/hac tun oder Sie initialisieren über das ant-Ziel:
ant initialize
Plugin konfigurieren
Plugin konfigurieren
Nach der Installation müssen Sie das Plugin konfigurieren, um Ihren Store mit unserer Plattform zu verbinden.
Dieser Abschnitt der Dokumentation befasst sich nur mit technischen Konfigurationselementen. Für eine Unternehmenskonfiguration im SAP Backoffice ist dieser Abschnitt von Bedeutung.
Merkmale konfigurieren
- Von worldlinedirectcore/project.properties:
worldline.direct.api.authorizationType=V1HMAC
worldline.direct.api.connectTimeout=10000
worldline.direct.api.socketTimeout=10000
worldline.direct.api.maxConnections=10
worldline.direct.api.integrator=Worldline
Das Java SDK übergibt diese Konfigurationen und kontrolliert die Verbindung. In unserer Java SDK Dokumentation finden Sie mehr Informationen.
- Von worldlinedirectbackoffice/project.properties:
worldline.contact.support.default.cc=
worldline.contact.support.default.bcc=
worldline.contact.support.default.subject=default subject
Diese Konfigurationen steuern die Schaltfläche innerhalb des SAP Back Office, die dazu dient, per E-Mail unsere Unterstützung anzufordern.
- Von worldlinedirectocc/project.properties:
worldline.occ.hostedCheckout.returnUrl=https://localhost:9002/occ/v2/%s/users/%s/orders/%s/hostedcheckout
worldline.occ.hostedTokenization.returnUrl=https://localhost:9002/occ/v2/%s/users/%s/orders/%s/hostedtokenization/return3ds
Diese Konfigurationen setzen den Wert fest für das Merkmal der Server API HostedCheckoutSpecificInput.ReturnUrl, damit Ihre Kunden wieder korrekt zu Ihrer Webshop-Umgebung weitergeleitet werden. Es ist wichtig, diese Werte zu aktualisieren, damit sie die URL Ihres Systems wiedergeben.
Webhooks konfigurieren
Das Plugin nutzt Webhooks, um den aktuellen Status Ihrer Transaktionen von unserer Plattform abzurufen. SAP Commerce verwendet den Endpunkt /worldline/webhook, um diese Aktualisierungen des Status zu erhalten.
Konfigurieren Sie einen WebhooksKey, WebhooksKeySecret und Endpoint URLs in Ihrer PSPID, so wie in unserer Anleitung beschrieben. Achten Sie darauf, dass die URL
- den Hostname Ihrer Site enthält '(z.B. https://<your-domain>:9002/worldline/webhook)'
- über ein gültiges SSL-Zertifikat verfügt
SAP konfigurieren
Die folgenden Schritte bilden das Konfigurationsverfahren für das Tool SAP Commerce Backoffice. Allgemeine Informationen zum SAP Commerce Backoffice finden Sie in den Anleitungen für geschäftliche Nutzer im SAP Help Portal.
Nach der erfolgreichen Installation enthält das SAP Backoffice einen neuen Elementtyp "Worldline Configuration". Mit diesen Schritten verbinden Sie Ihren Base Store in SAP Commerce mit unserer Plattform:
- Loggen Sie sich in das SAP Commerce Backoffice ein mit der Standard-URL https://<hostname>:9002/backoffice. Die Standardanmeldedaten für den Administrator wurden während der Installation festgelegt oder sie wurden Ihnen getrennt zugestellt
Gehen Sie zu Worldline > Worldline Konfiguration. Klicken Sie auf das „+“ - Symbol auf der Taskleiste.
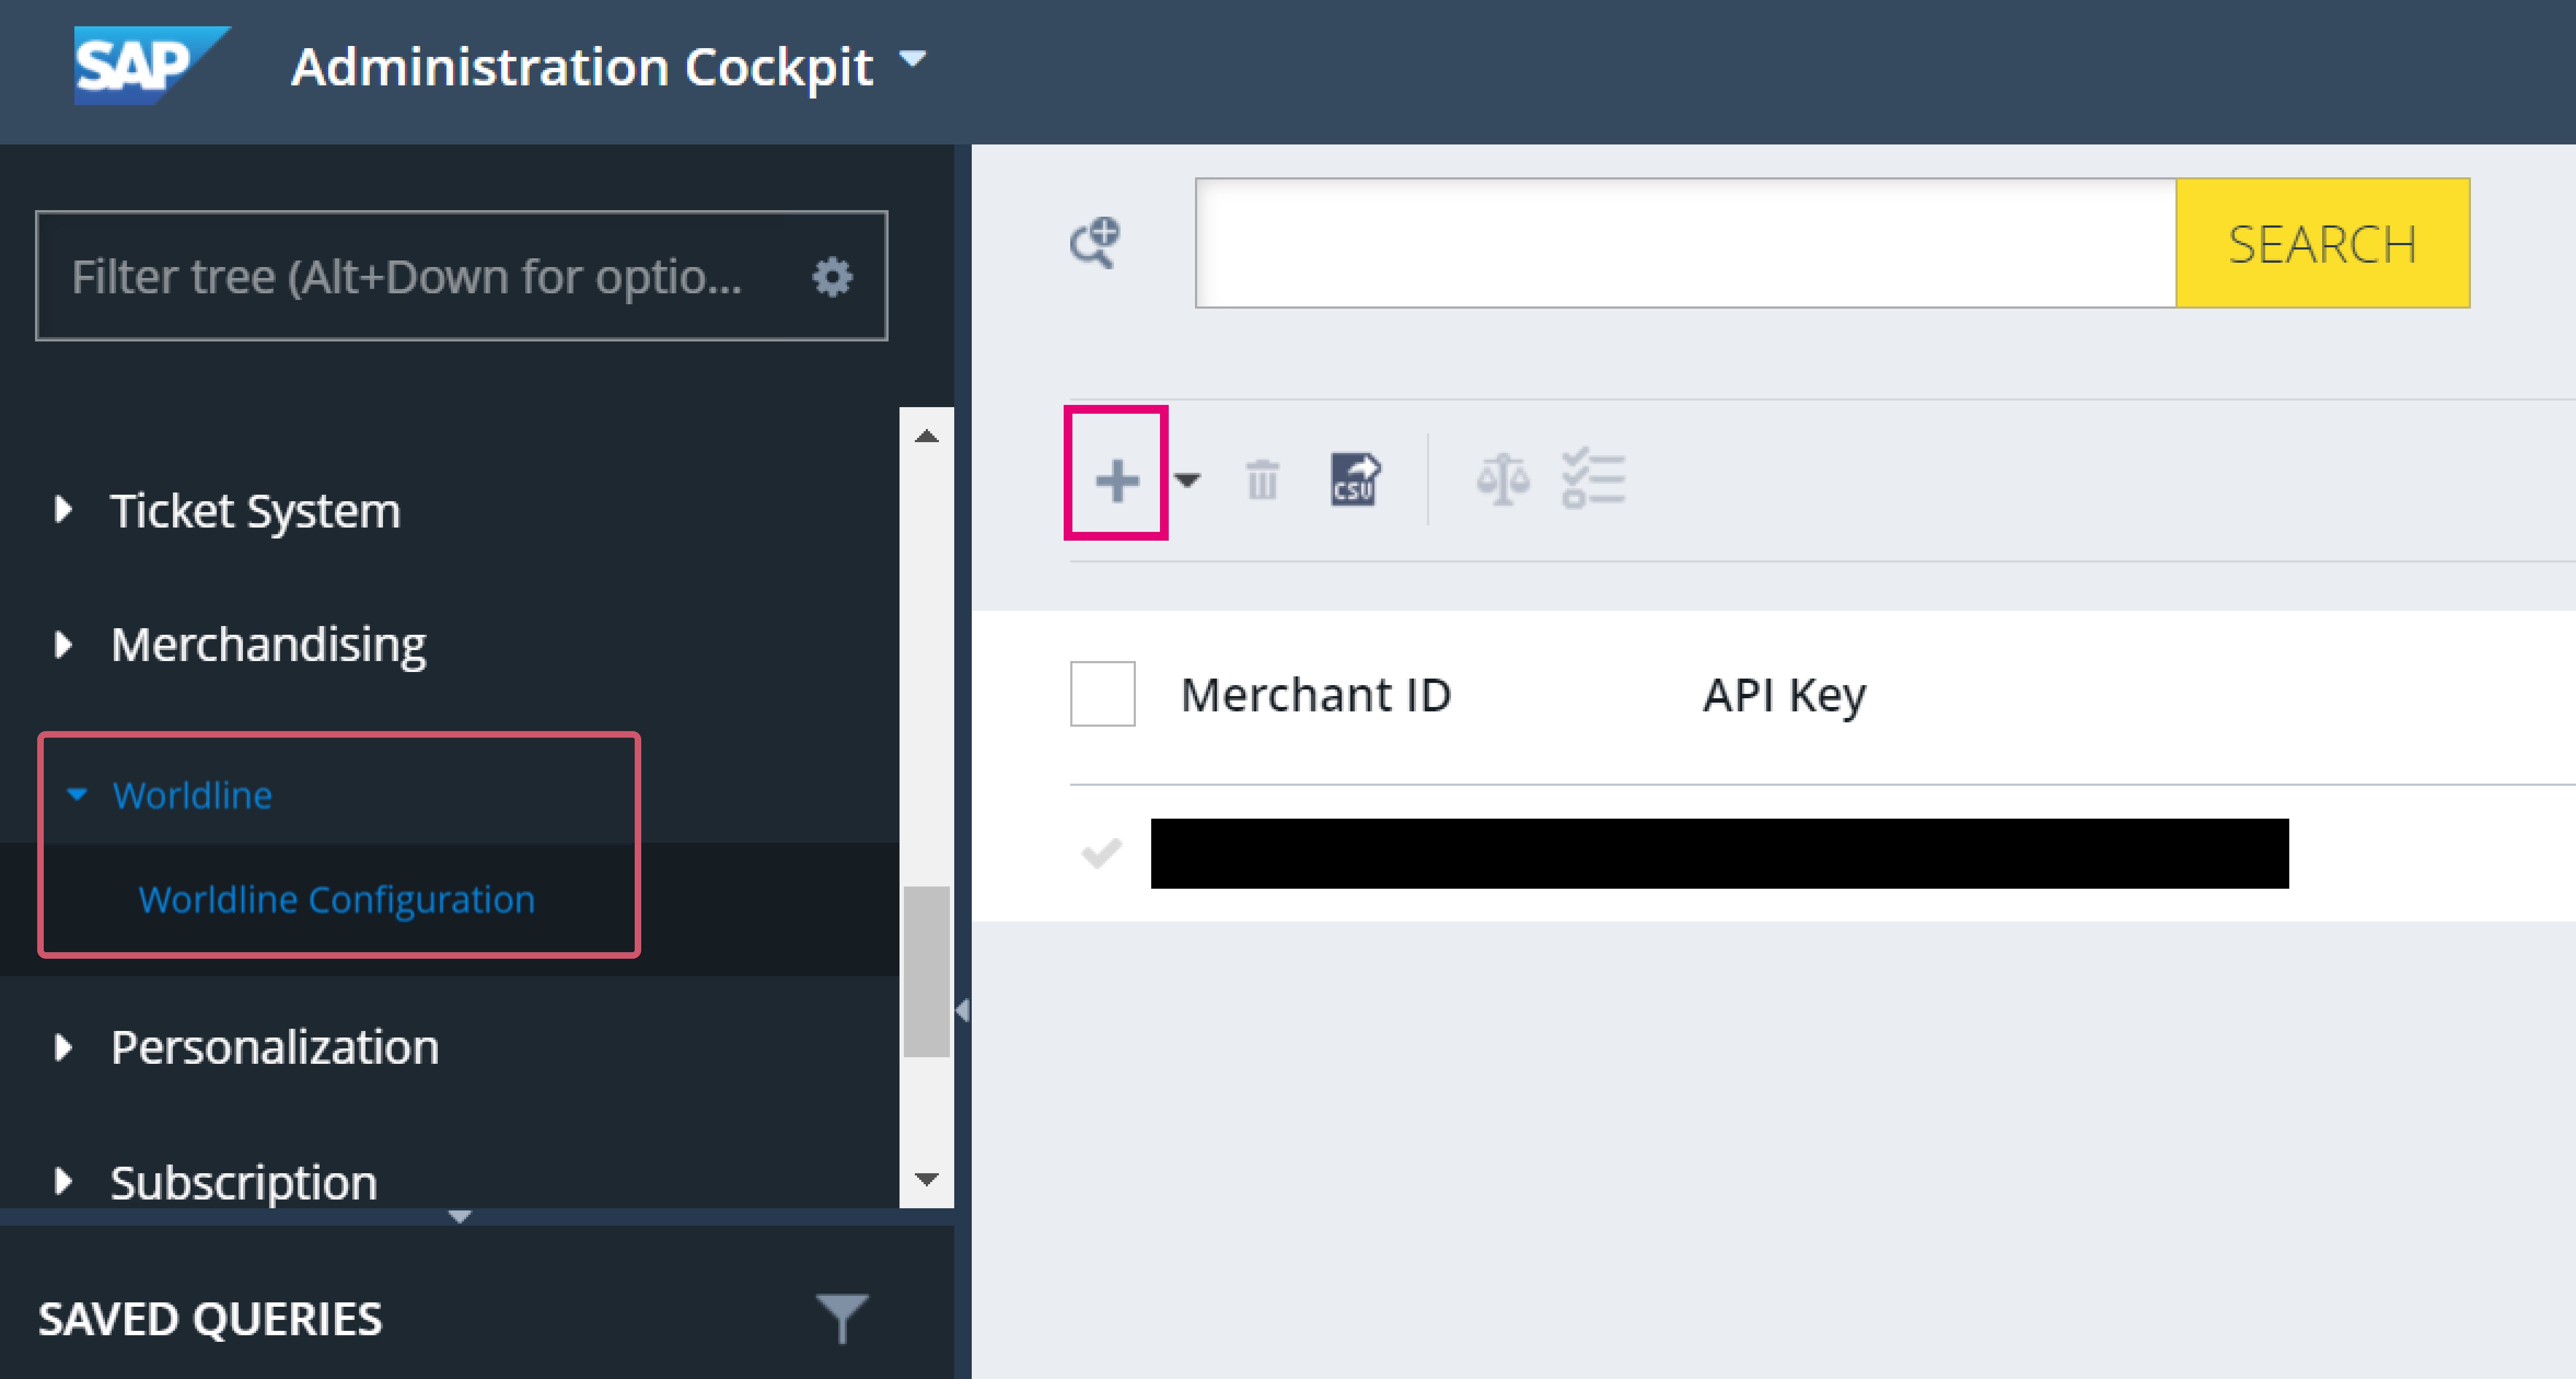
- Geben Sie Folgendes aus der Tabelle aus dem Pop-up-Fenster, das erscheint, ein:
| Merkmal | Beschreibung/Aktionen |
|---|---|
| API Key | Geben Sie den API-Schlüssel Ihrer Test- oder Live-PSPID ein. Erfahren Sie in unserer Anleitung, wie Sie einen generieren. |
| API Secret | Geben Sie das API-Geheimnis Ihrer Test- oder Live-PSPID ein. Erfahren Sie in unserer Anleitung, wie Sie einen generieren. |
| Ask Consumer Consent | Dies wird im folgenden Schritt konfiguriert: |
| Endpoint URL |
Der Test- oder Live-Endpunkt auf unserer Plattform. Kopieren Sie ihn aus unserer Anleitung.
|
| Merchant ID | Geben Sie die PSPID auf unserer Plattform ein, die Sie für die Verarbeitung der Transaktionen verwenden möchten. |
| webhookKeyId | Geben Sie die webhookKeyId Ihrer Test- oder Live-PSPID aus dem vorhergehenden Schritt ein. |
| webhookSecret | Geben Sie das webhookSecret Ihrer Test- oder Live-PSPID aus dem vorhergehenden Schritt ein. |
Klicken Sie zur Bestätigung auf „FERTIG“.
- Klicken Sie auf das Konfigurationsprofil in der Tabelle, die Sie gerade bestätigt haben. Geben Sie Folgendes aus der Tabellenübersicht an:
| Merkmal | Beschreibung/Aktionen |
|---|---|
| OPERATION CONFIGURATION |
Wenn der Betriebscode auf „Autorisierung“ eingestellt ist, achten Sie auf Folgendes:
|
| TOKENIZATION CONFIGURATION |
|
Klicken Sie zur Bestätigung Ihrer Konfiguration auf „SPEICHERN“.
Base Store konfigurieren
Bevor Sie mit der Verarbeitung von (Test-) Transaktionen beginnen, müssen Sie
- Ihre Base Stores mit der Plugin-Konfiguration verbinden
- einen Integrationsmodus wählen.
Zu diesem Zweck führen Sie die folgenden Schritte aus, indem Sie bei jedem Tab auf „SPEICHERN“ klicken:
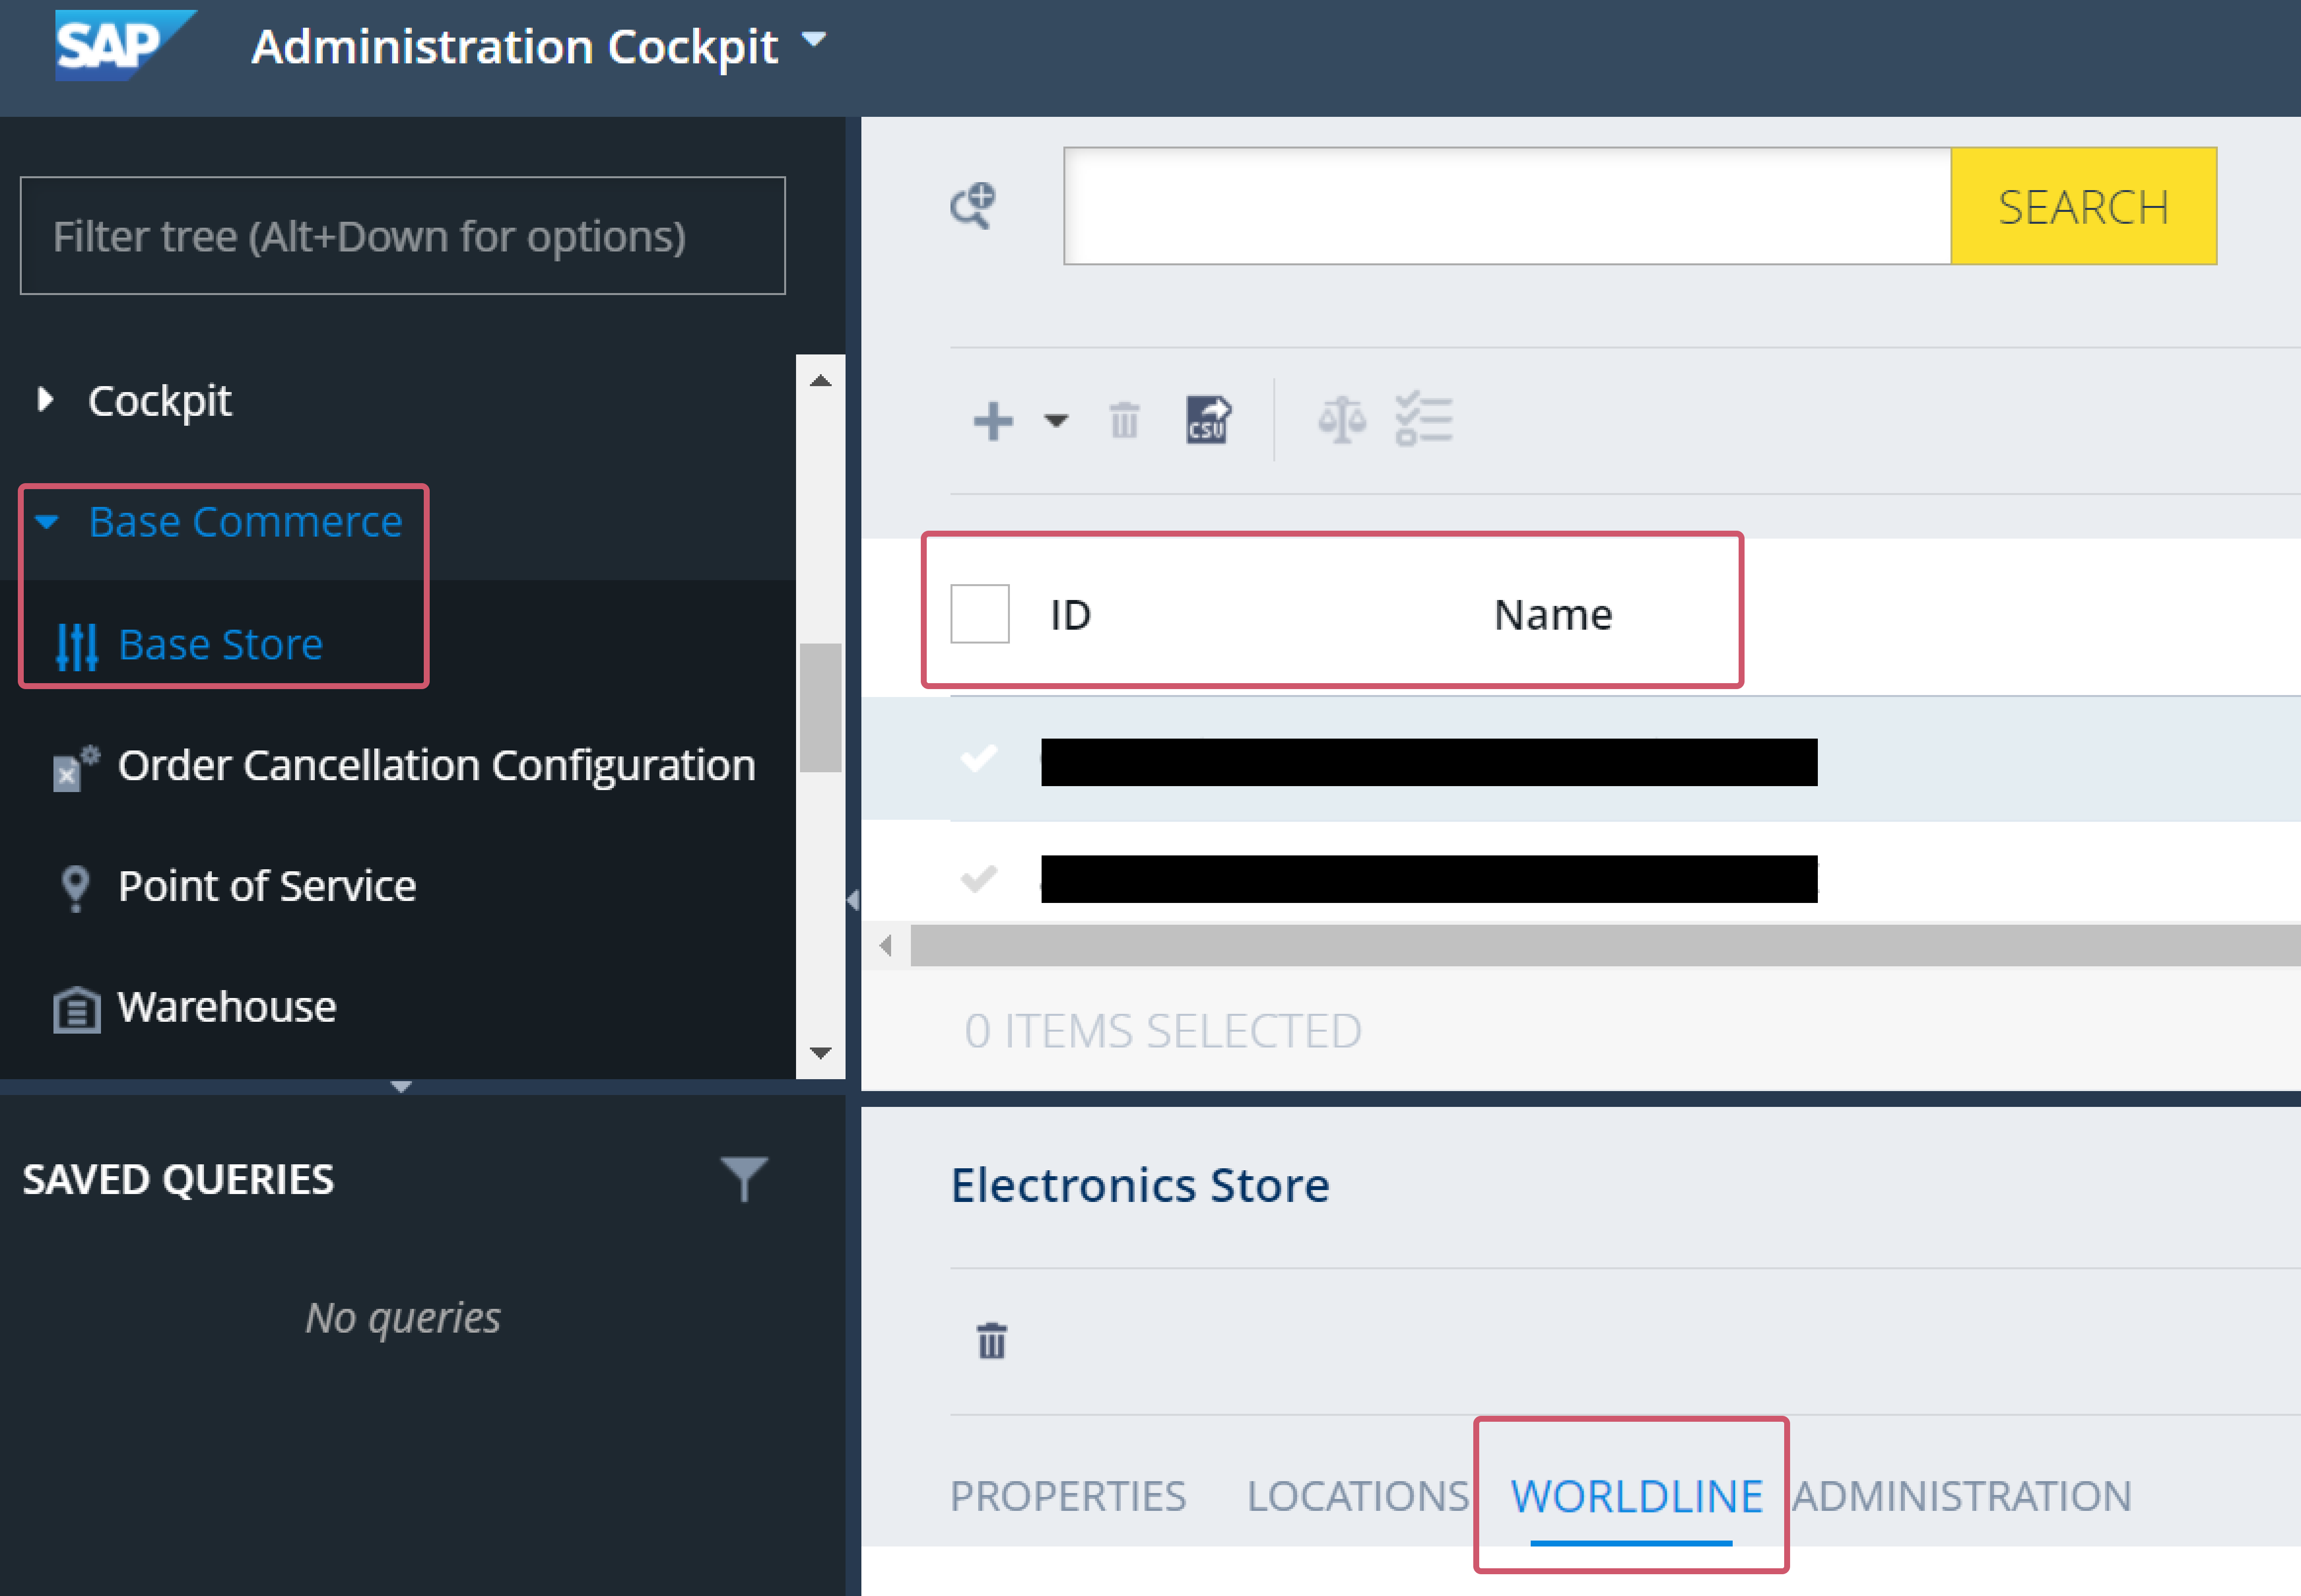
- Gehen Sie zu Base Commerce > Base Store. Wählen Sie den Store aus der Tabelle mit den Überschriften „ID“ / „Name“.
Wählen Sie „Worldline“ aus den verfügbaren Tabs und scrollen Sie herunter zu „WORLDLINE KONFIGURATION“.
Merchants can now share feedback or request additional features via the “Request a new feature” button inside the plugin.
Click on the configuration profile in the table you have just confirmed. Enter the following from the table overview:
Worldline Tab
| Property | Description/Actions |
|---|---|
| Operation configuration |
If "Operation Code" is set to "Authorization", beware of the following:
|
| Tokenization configuration |
|
| Grouped cards configuration |
|
| Recurring payments configuration |
|
| Payment method sorting | Configure the order in which payment methods are displayed on the checkout page. |
| Bank transfers |
|
| Intersolve configuration | Configure the Session Timeout for Intersolve payments. |
3-D Secure Configuration (3DS tab)
| Property | Description/Actions |
|---|---|
| Enable 3DS |
Enable or disable 3-D Secure. We strongly recommend selecting "Yes" as 3-D Secure is mandatory in some markets. This will also ensure liability shifts for transactions with successful 3-D Secure authentication. If you select "No", you may not benefit from liability shifts and may be held liable. |
| Enable mandatory 3DS |
Define whether to enforce Strong Customer Authentication (SCA) regardless of any possible exemptions. |
| Exemption type |
Define the type of exemption you want to offer. The available options are No challenge request (Default), Low-value, and Transaction-risk-analysis. |
| Exemption limit (No challenge request) |
Request the issuer to skip 3-D Secure for baskets up to 100 EUR. |
| Exemption limit (Low-value) |
Request exemptions for baskets up to 30 EUR. |
| Exemption limit (Transaction-risk-analysis) |
Request exemptions based on a risk analysis performed by the acquirer or the issuer, for baskets up to 100 EUR. |
Click on “SAVE” to confirm your configuration.
Configure Base store
Before you start processing (test) transactions, you need to
- Link your Base stores with the plugin configuration.
- Select an integration method.
To do so, follow these steps and confirm by clicking "SAVE" in each tab:
- Go to Base Commerce > Base Store. Select the store from the table with headers "ID" / "Name".
Select "Worldline" from the available tabs and scroll down to "WORLDLINE CONFIGURATION".
- Geben Sie Folgendes aus der Tabellenübersicht an:
| Merkmal | Beschreibung/Aktionen |
|---|---|
| Payment Provider Configuration | Verbindet Ihren Base Store mit einem Konfigurationsprofil Klicken Sie auf das Feld, um das Konfigurationsprofil zu wählen, das Sie in den vorherigen Schritten erstellt haben. |
| Checkout type | Wählen Sie einen Integrationsmodus für die Verarbeitung von Transaktionen. Wenn Sie „Hosted Tokenization“ wählen, müssen Sie eine Vorlage konfigurieren via Worldline > Worldline Konfiguration. Wechseln Sie nicht zwischen Check-out-Modi, während die Site live ist. Dies könnte zu unerwünschten Effekten während des Zahlungsvorgangs Ihrer Kunden führen. |
| Art des Check-out | Beschreibung/Aktionen |
|---|---|
| Hosted Tokenization | Alle Kartenmarken sind in einem einzigen iframe auf Ihrer Check-out-Seite über unsere Hosted Tokenization Page zusammengefasst. Lesen Sie unsere Anleitung über Hosted Tokenization Page, um mehr über diesen Integrationsmodus zu erfahren. Bancontact ist nur im QR-Code-Modus auf Hosted Checkout Page verfügbar. |
| Hosted Check-out | Jede Kartenmarke wird einzeln aufgeführt, damit sie nach einer entsprechenden Auswahl auf unsere Hosted Checkout Page zurückgeleitet werden kann. Lesen Sie unsere Anleitung über Hosted Checkout Page, um mehr über diesen Integrationsmodus zu erfahren. |
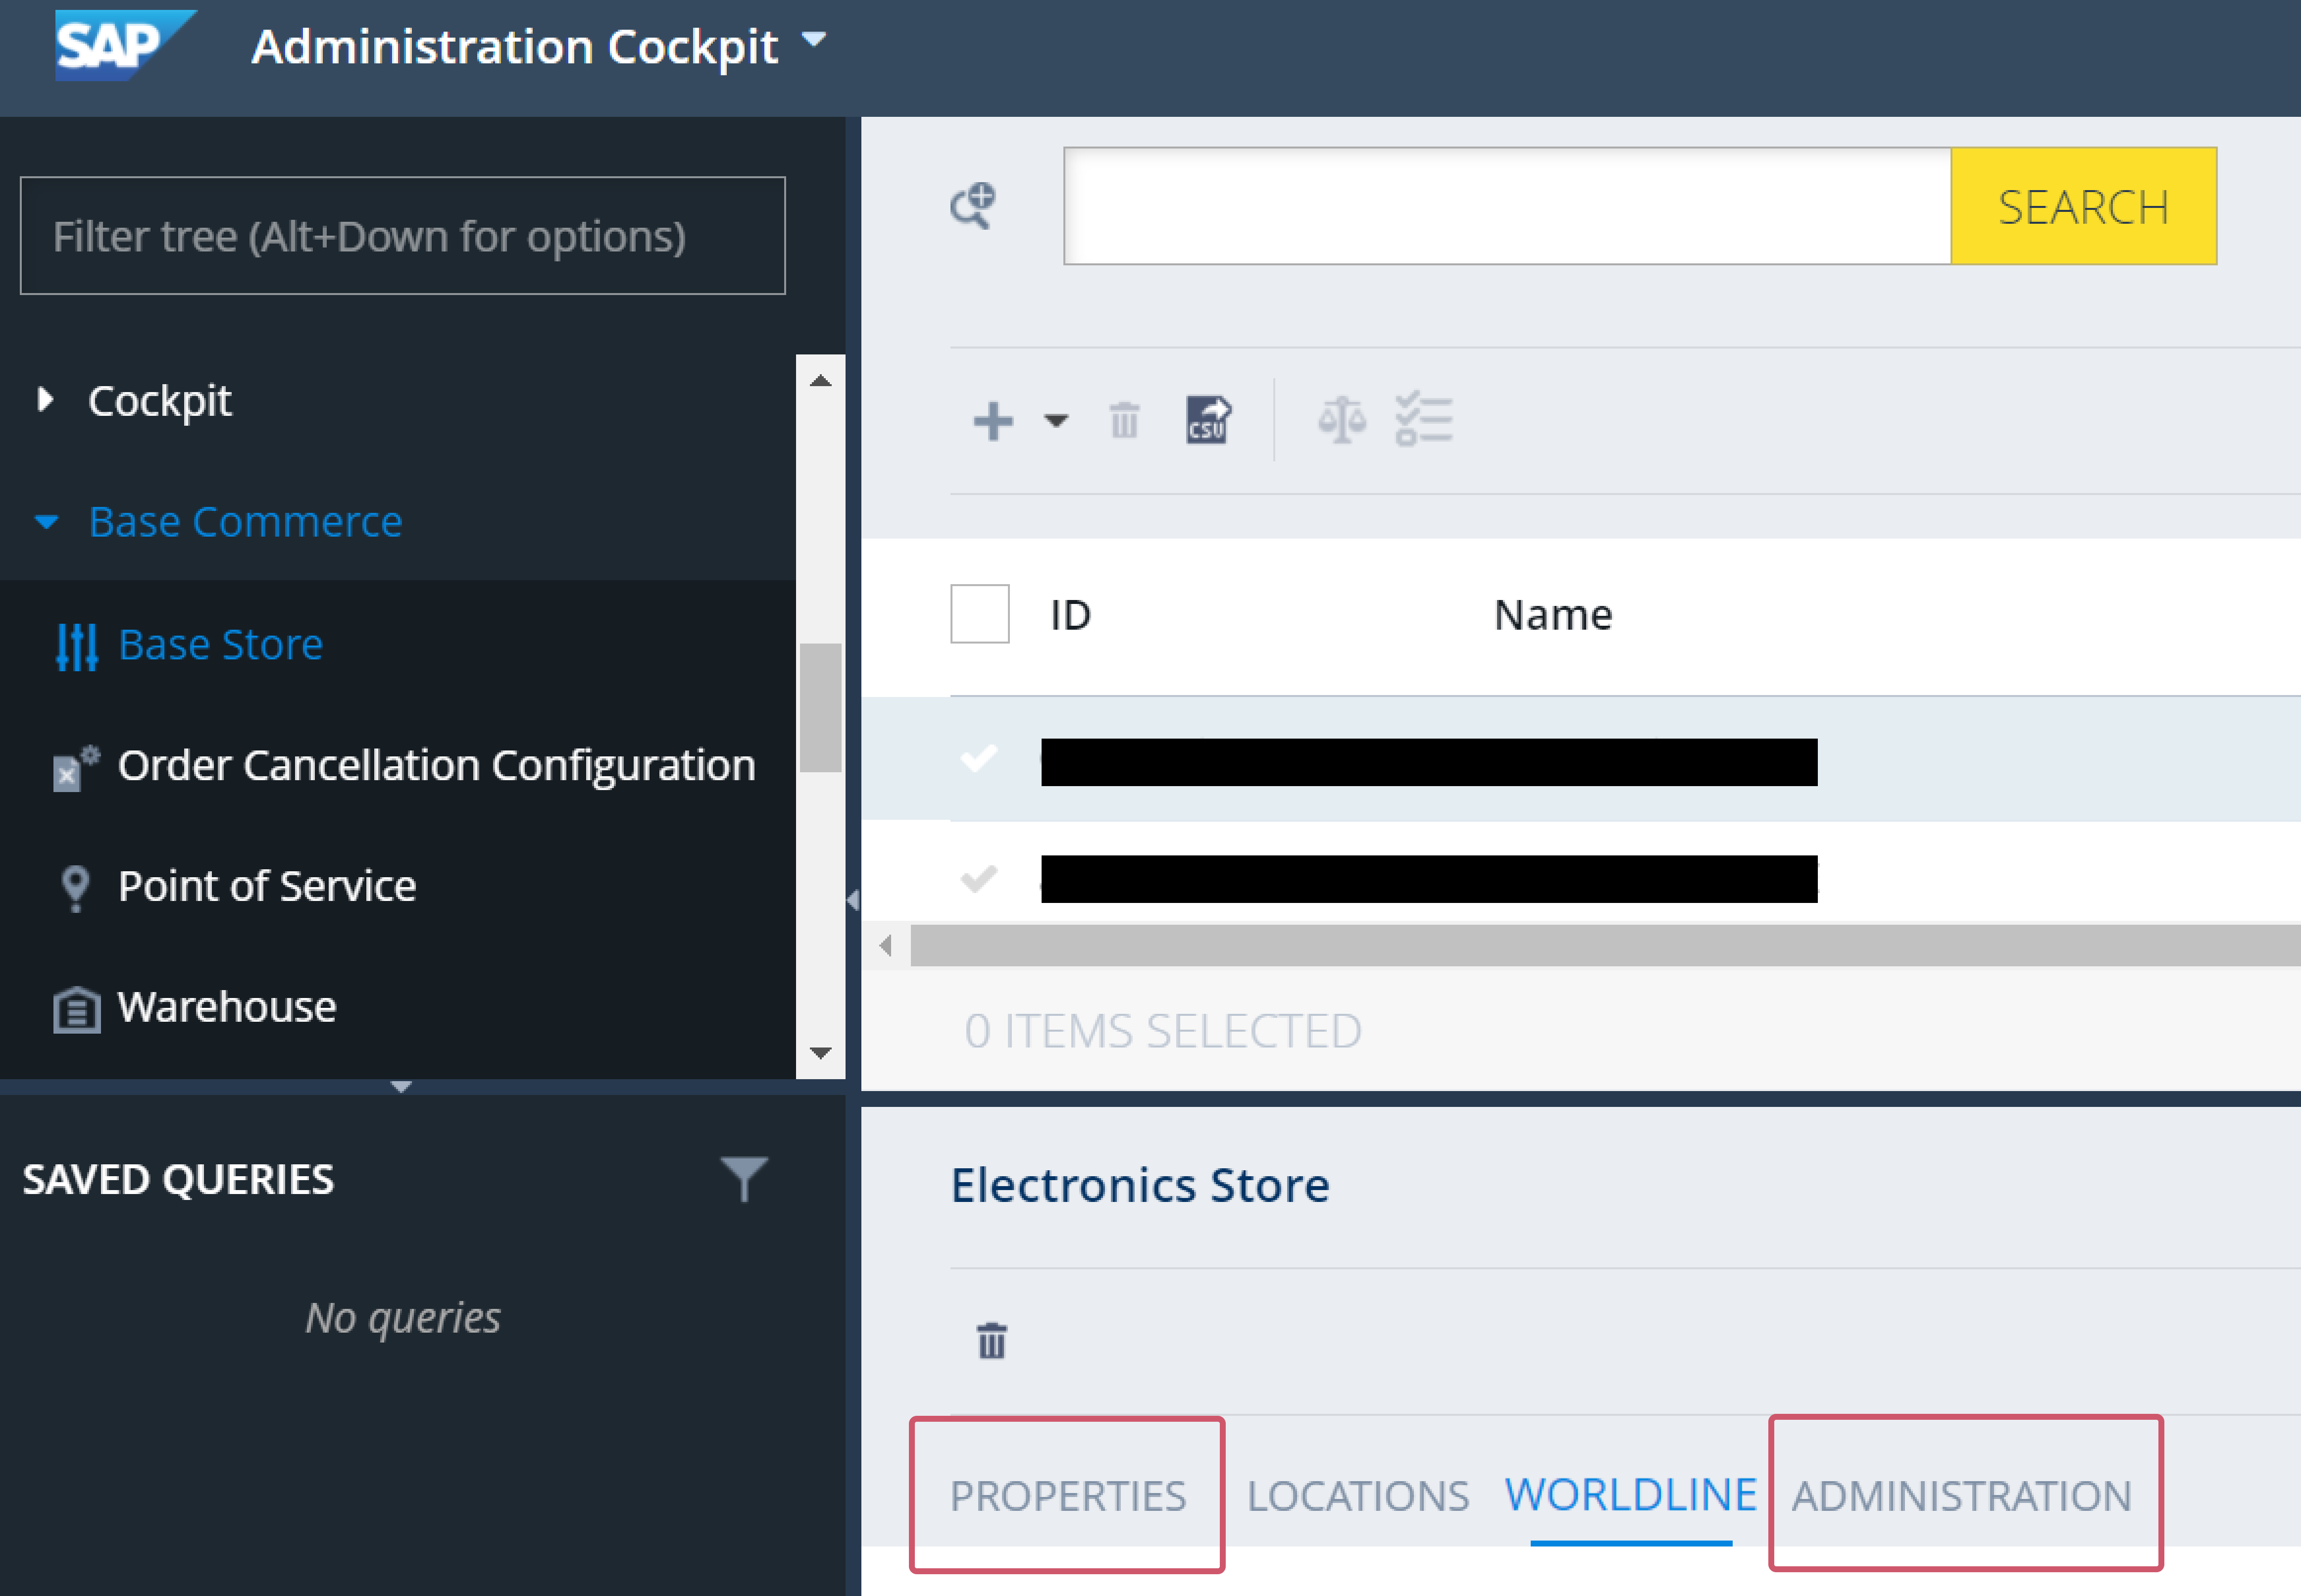
- Wählen Sie „ADMINISTRATION“ aus den verfügbaren Tabs und scrollen Sie herunter zu „UNBOUND“. Geben Sie „worldlineB2CResponsiveCheckoutGroup“ in das Feld „Checkout Flow Group“ ein.
Wählen Sie „PROPERTIES“ aus den verfügbaren Tabs aus und scrollen Sie herunter zu „PAYMENT PROVIDER“. Geben Sie in das Feld „Payment Provider“ „Worldline“ ein.
Configure Payment Modes
To configure this list of Payment Modes in SAP Commerce, navigate to the following menu in Backoffice:
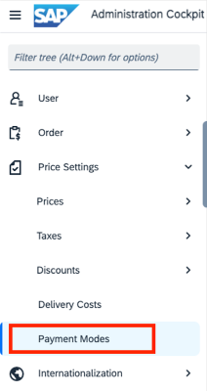
Once you click on Payment Modes, you will see a list of Payment Modes currently loaded in the system. After selecting a Payment Mode, you can enable or disable it by changing the isActive flag.
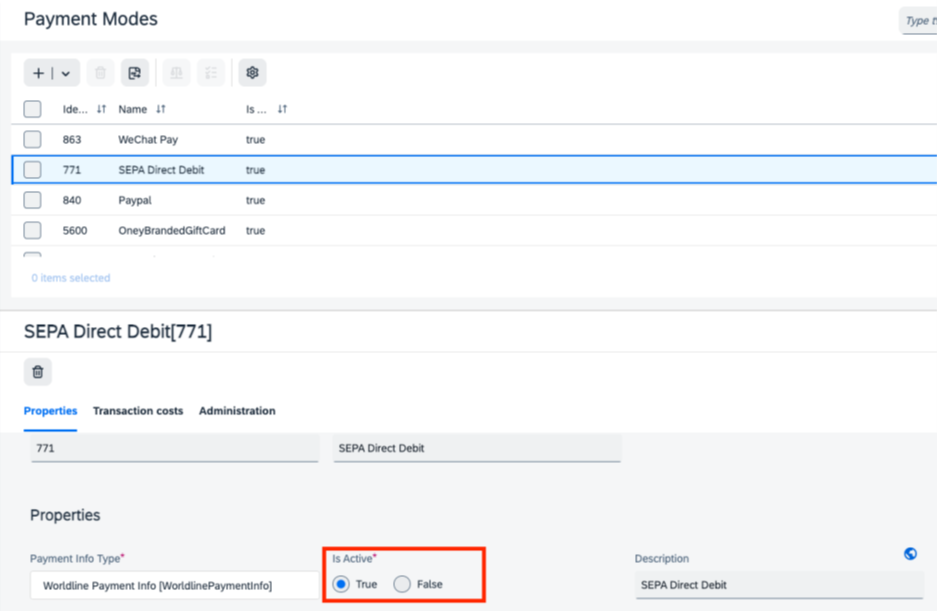
If you add a new Payment Mode to your account in the Worldline Merchant Portal, you may need to manually add it to the system by clicking the '+' button at the top of the Payment Modes List.
Usage of Mealvouchers
Our plugin supports the Mealvouchers payment method. You must mark it as eligible to enable it. To flag the products, you can simply edit them individually in the SAP Backoffice.
To do so, follow these steps:
- Log in to the SAP Backoffice as administrator. Go to "Products" on the navigation bar.
- Select the product you wish to configure.
- Go to the Administration tab and search for Worldline Mealvoucher Product Type to find the attribute.
- Choose between three different values:
- Food and Drink
- Home and Garden
- Gifts and Flowers
- Select a value and click "Save".
Configure Card On File
To configure Card On File, go to Worldline > Worldline Recurring Token.
This list shows all available tokens for Card On File in your system. Click in the respective line in the table to get a comprehensive overview about the individual token and possible actions:
| Property | Description |
|---|---|
| Token | Unique identifier of the token on our platform. Returned by our platform when creating the token with the first order. |
| Alias | Masked card number linked to this token. |
| Cardholder name | Name of the cardholder linked to this token. |
| Expiry date | Expiry date of the card linked to this token. |
| Subscription ID | Unique identifier of the replenishment order and of the cronjob generating all subsequent orders. |
| Status |
The token's status. Possible values:
|
| Customer |
Unique identifier of your customer who placed the initial order when creating the token. Refer to the Administration tab for more information. |
| Store |
Unique identifier of the store ID managing the replenishment. Refer to the Administration tab for more information. |
Manage SEPA mandates
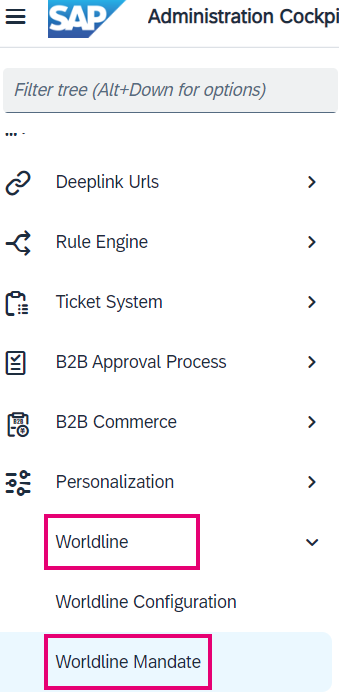
To manage mandates for SEPA Direct Debits payments, go to Worldline > Worldline Mandates > ORGANIZATION or ADDRESS tab.
This list shows all available mandates in your system. Click in the respective line in the table to get a comprehensive overview about the individual mandate and possible actions:
| Property | Description |
|---|---|
| Iban | Bank acount number (IBAN) linked to this mandate. |
| CompanyName | Company name of the customer linked to this mandate. |
| EmailAddress | E-mail address of the customer linked to this mandate. |
| Country | Billing data of the customer linked to this mandate. |
| City | |
| Street | |
| House Number | |
| Zip code | |
| Title | |
| First Name | |
| Last Name | |
| Store | Unique identifier of the store ID managing the order linked to this mandate. |
| Unique Mandate Reference | Unique identifier of the mandate on our platform. Returned by our platform when creating the mandate with the first order. |
| Customer | Unique identifier of the customer linked to this mandate. |
| Status |
The Mandate's status. Possible values:
You can manually activate/block mandates using the respective "Block"/"UnBlock" buttons. Mind that clicking the "Revoke" button is irreversible. |
| Recurrence type |
The mandate's validity. Possible values:
|
| Customer reference |
Unique reference for your customer pointing to the order ID or subscription ID when creating the mandate. |
.png?language_id=1)
Replenishment Orders
Both B2B and B2C storefronts have access to the replenishment order feature. There are several configurations you need to set to customise it, which we have explained in the previous sections.
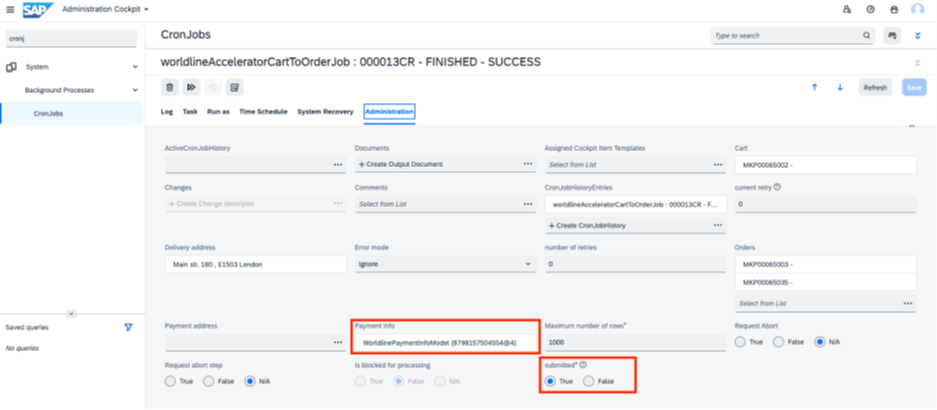
Replenishment orders are created using a cronjob. You need the following properties for replenishment order processes:
- Cart – This is the blueprint of the replenishment order.
- Orders – List of orders placed using the Cart data. The first placed order is the one that the customer places manually during the checkout process. All subsequent orders are created from the cronjob.
- CronJobHistoryEntries – Keeps information about cronjob executions.
- Payment Info – The payment info used for server-to-server calls to Worldline used to process payments for subsequent orders.
- Submitted – This property is used to indicate there were no issues during cronjob creation. If it is set to false, no future orders will be created.
You can find all detailed configurations and processes in the README guide shipped with the plugin package.
Zahlungen verwalten
We have designed the plugin to follow up on your orders automatically and autonomously, freeing you from the administration involved. Learn here how to use our plugin effectively, which could help your business to thrive!
Perform maintenance operations
Captures, refunds and cancellations of authorisations are standard processes (also known as maintenance operations) in your everyday business logic. You can perform these operations on a transaction using the Customer Support Backoffice.
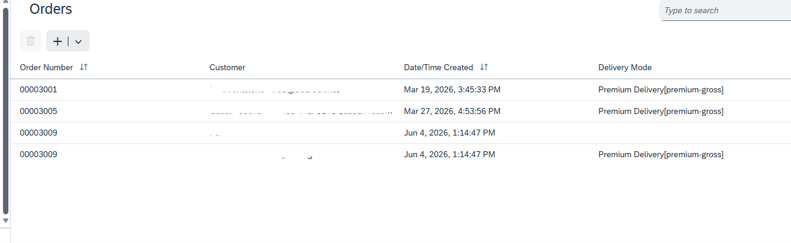
Once you log in to the Customer Support Backoffice, all orders will be listed in the Orders section. You can select the order you want to perform maintenance operations on.
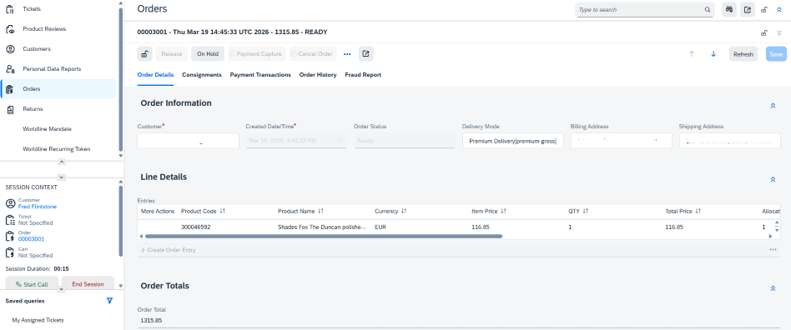
You can perform actions like capturing or cancelling payments from the options available at the top of the order details section. Cancelling an order will trigger a refund request or authorisation cancellation where applicable.
Managing recurring tokens
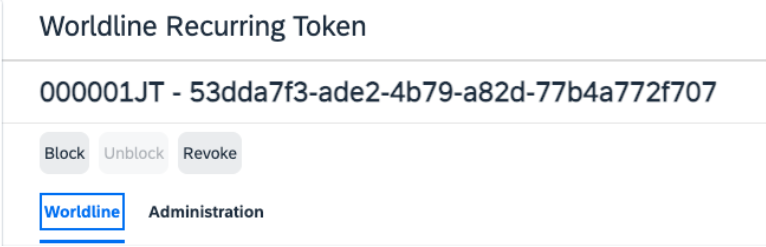
Maintenance operations also allow you to manage recurring tokens. You may Block, Unblock, or Revoke them.
Managing mandates
You can manage the status of mandates through the following actions: Block, Unblock or Revoke.
Zahlungen verwalten
Unser Plugin ist so konzipiert, dass Ihre Aufträge automatisch und autonom bearbeitet werden. Das befreit Sie von lästigen Verwaltungsarbeiten. Hier erfahren Sie, wie Sie Ihr Plugin effektiv für Ihre Geschäfte nutzen können.
Wartungsmaßnahmen durchführen
Erfassen, Gutschriften und die Stornierung von Autorisierungen sind Standardverfahren (auch bekannt als Wartungsmaßnahmen) Ihrer täglichen Geschäftsabläufe. Hier erfahren Sie, wie Sie diese Operationen im SAP Backoffice ausführen.
Testtransaktionen durchführen
Testtransaktionen durchführen
Verwenden Sie die Test-Umgebung unserer Plattform, um sicher zu gehen, dass Ihr Plugin wie gewünscht funktioniert. Wir bieten Testdaten auf unserer eigens dafür eingerichteten Testszenarios-Seite. Steuern Sie unsere Test-Umgebung wie im Kapitel "Plugin konfigurieren" beschrieben an.
Sorgen Sie dafür, auf die LIVE-Umgebung zu wechseln, sobald Sie Ihre Tests abgeschlossen haben.