Hosted Tokenization Page

- Delegate handling sensitive data to us for PCI compliancy
- Flexible and easy visual adaptation & customisation
- Ease future purchases and recurring payments for your customers!
Get started
Um Transaktionen auf unserer Plattform mit dieser Lösung zu verarbeiten, stellen Sie Folgendes sicher:
- Sie haben ein Konto auf unserer Plattform
- Mindestens eine dieser Zahlungsarten ist in Ihrem Konto aktiviert Überprüfen Sie dies im Back Office via Konfiguration > Zahlungsmethoden
- Sie haben Ihren API Key und API Secret in Ihrem Konto konfiguriert
- Ihr Server kann Server-zu-Server-Anfragen über unsere RESTful-API senden. Mit einem unserer Server SDKs wird diese Aufgabe erheblich erleichtert
Sind Sie bereit? Dann erfahren Sie im nächsten Kapitel, wie Sie unsere Hosted Checkout Page-Lösung einsetzen können!
.png?language_id=3)
How it works
Bevor Sie Live-Transaktionen verarbeiten, sollten Sie unsere Testumgebung nutzen. Lernen Sie unsere Lösung ohne Kosten oder Verpflichtungen kennen! Wenn Sie Ihre Website freischalten wollen, sehen Sie hier, wie Sie ein Livekonto erhalten oder kontaktieren Sie uns!
To qualify for SAQ-A for this integration method, you need to comply with the eligibility criteria. Refer to the PCI Security Standards Council’s library for a full overview.
Aktuellste API Basis-URL nutzen
Wir raten Ihnen, immer die aktuellste API Basis-URL zu nutzen, wenn Sie Anfragen an unsere Plattform senden. In unseren ausführlichen Anleitungen finden Sie eine komplette Übersicht:
Für einen reibungslosen Übergang bleiben vorherige API Basis-URLs bis auf weiteres verfügbar.
Ways to integrate
1Use our SDKs
Use our Server SDKs to seamlessly connect your server environment to our platform's Server API. These SDKs simplify the API's functionality with easy-to-use platform-specific objects.
2Use our plugins
Our Plugins provide a seamless link between your webshop and our platform. By effectively wrapping our RESTful API, these plugins save you time on writing code and make integration quick and easy.
Integration steps
Your customers have to provide their credit card number at one point during their journey in your webshop. As a merchant, the greatest challenge is to link all steps during this journey into one seamless experience. At the same time, you need to ensure the safe transfer of your customers' data to the financial institutions handling the data.
Therefore, you can either:
- Outsource the necessary security precautions completely (by using our Hosted Checkout Page solution). However, this method has limits: Your customers will notice a redirection to an external URL - a noticeable break in the payment flow.
- Collect the sensitive data on your own (by using our Server-to-server solution). But this requires you to fulfil the highest PCI requirements - which involves a lot of effort.
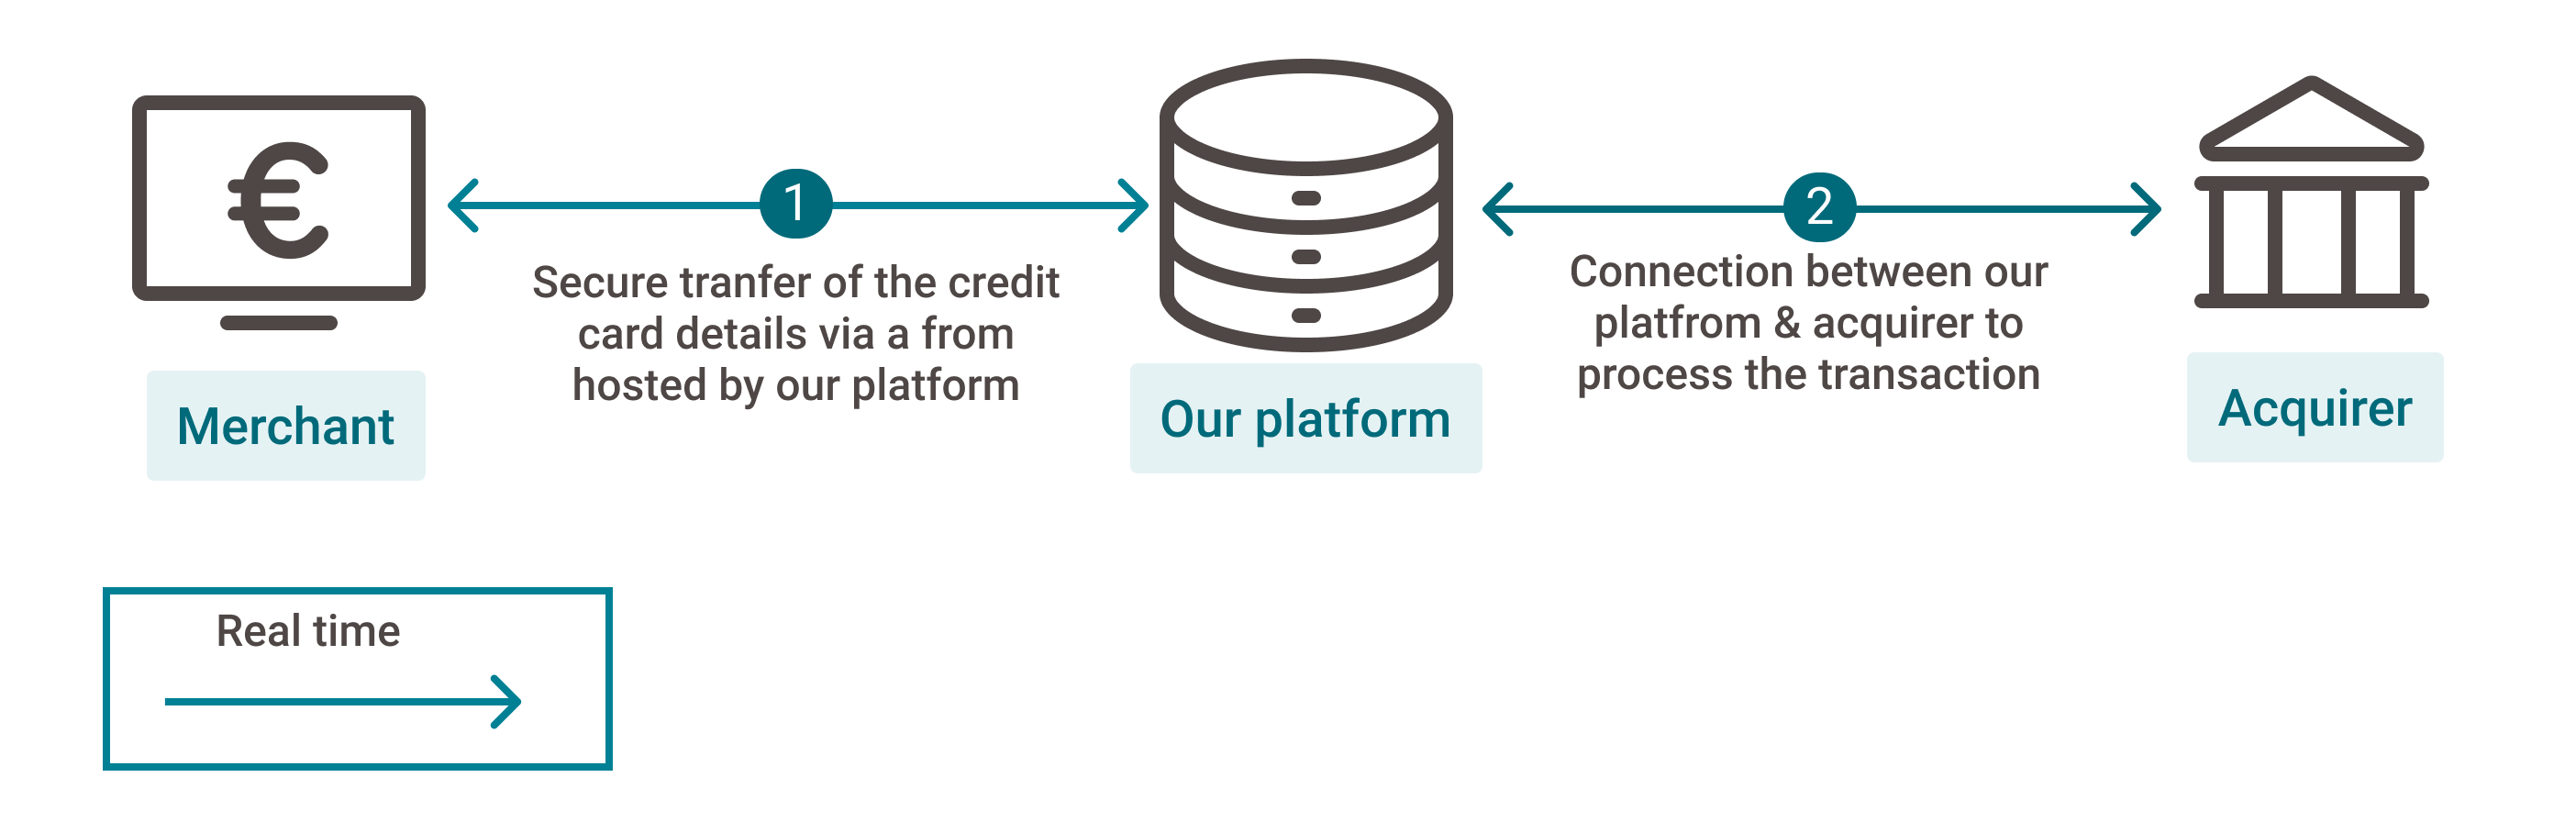
Our Hosted Tokenization Page solves this dilemma for you by combining the best of both worlds:
- Let us handle the credit card data without your customers noticing. Just add an
<iframe>to your webshop containing the payment form. As we are the host, the sensitive data come and stay at our end! We exchange the actual payment card number for a token which is not in scope for PCI. - Use this payment token for the actual payment request via the Server-to-server integration method.
- At the same time, merge it seamlessly into your webshop's look and feel. Adapt the payment form completely at will!
Our Hosted Tokenization Page works with all card payment methods.
The following chapters cover a high-level overview of a typical flow. It describes all the steps you need to follow for processing transactions. Find a detailed overview including optional steps, 3-D Secure authentication etc. in the dedicated chapter.
- Build checkout page & set up Content Security Policy
- Initialise Server SDK
- Create HostedTokenization session
- Add iframe to checkout page
- Submit & tokenise card details
- Send CreatePayment request
- Process platform response
- Get & show transaction result
Build checkout page & set up Content Security Policy
Our Hosted Tokenization Page solution requires your checkout page to implement
- Specific HTML/JavaScript elements
- Content Security Policy
Add the following HTML/JavaScript elements on your checkout page:
<div id="div-hosted-tokenization"></div>
<button onclick="submitForm()">submit</button>
<script src="https://payment.preprod.direct.worldline-solutions.com/hostedtokenization/js/client/tokenizer.min.js integrity=createHostedTokenizationResponse.sri crossorigin="anonymous" "></script> <!-- contains the methods needed for tokenization -->
<script>
  var tokenizer = new Tokenizer(hostedTokenizationUrl, 'div-hosted-tokenization', {hideCardholderName: false });

  // Invoking tokenizer.initialize() will add the <iframe> inside the previously referenced <div> element
  tokenizer.initialize().then(() => {
    // Do work after initialization, if any
  })
  .catch(reason => {
    // Handle iFrame load error
  })
  function submitForm(){ //
    tokenizer.submitTokenization().then((result) => {
    if (result.success) {
      // Proceed by storing the result.hostedTokenizationId from our platform to be used in
         subsequent steps
    } else {
      // displayErrorMessage(result.error.message);
    }
  });
}
</script>
The individual elements fulfil a specific role during the payment flow:
|
Element |
Description |
|
<script src="https://payment.preprod.direct.worldline-solutions.com/hostedtokenization/js/client/tokenizer.min.js integrity=createHostedTokenizationResponse.sri crossorigin="anonymous" "></script> |
Load the Tokenizer library for the test/live environment. Make sure to also add the following attributes to enable the subresource integrity check for the Tokenizer library:
Mind that you need to load the script from our server rather than hosting it yourself. |
|
<div id="div-hosted-tokenization"></div> |
Invoking the initialize() function adds an <iframe> to this <div> element. At the same time, the <iframe> opens the hostedTokenizationUrl you have previously requested via a CreateHostedTokenization request. The <iframe> loads a page hosting the payment mask on our side your customers use to enter their PCI-DSS-sensitive data. You can customise the elements of this <iframe> freely. Follow the instructions in this dedicated chapter to learn how to create and upload the template. |
|
<button onclick="submitForm()">submit</button> function submitForm() |
Invoking submitForm() function submits the card data from the <iframe> to our platform for tokenisation. Our platform returns a unique hostedTokenizationId for each session. Use this hostedTokenizationId to create the actual payment in a subsequent CreatePayment request. Mind that this <button> element is NOT part of the <iframe> itself. Therefore, you need to add it to your checkout page yourself. Despite this, our API explorer still allows you to simulate the full payment flow. Learn how it works in the dedicated chapter. |
|
var tokenizer |
The instance of the Tokenizer class providing all functionalities you need for the payment process, i.e.
|
Content Security Policy
If you have set up a Content Security Policy for your website, you need to whitelist our domains. This will allow loading the tokenizer file and let us capture its logs.
To do so, add the domain https://payment.preprod.direct.worldline-solutions.com/ to the script-src, connect-src and frame-src directives of your Content Security Policy definition.
Initialise Server SDK
Initiate the Server SDK by defining connection URLs, your PSPID on our platform and API Key/Secret. Read the documentation of your preferred SDK to learn more.
As our SDKs always implement the latest version of our API, you can leave out "v2" in your code as shown in the examples.
Endpoint Urls in test / live
- Endpoint URL TEST: https://payment.preprod.direct.worldline-solutions.com/{merchantId}/hostedtokenizations
- Endpoint URL LIVE: https://payment.direct.worldline-solutions.com/{merchantId}/hostedtokenizations
Replace "{merchantId}" with your test/live account on our platform. Learn more about the "merchantId" in our glossary.
If you are using our Server SDKs, your application needs to target the respective environment / integration method URL via instances of CommunicatorConfiguration/ IClient/ CreateHostedTokenizationRequest. Detailed information about the how-to are available in the following chapters, including full code samples.
When processing online transactions, keeping track of your conversion rate is paramount. We are eager to help you with this, via our MyPerformance tool or via our transaction databases our customer support team is happy to share with you.
To ensure we can provide you with the most precise conversion rate data, we highly recommend the following best practices:
- When submitting a transaction request to our platform, always send the customer email address order.customer.contactDetails.emailAddress.
- When resubmitting a transaction request to our platform for a unique order (i.e. after having received a status.statusOutput=2 during the first try), always send the same order.references.merchantReference from your first try.
Create HostedTokenization session
Your web shop application's backend sends a CreateHostedTokenization request to our platform. In the response, our platform will return a hostedTokenizationURL the following properties:
- hostedTokenizationURL: The value for attribute src of the <iframe> hosting the payment mask.
- sri: The subresource integrity value (SRI) for the Tokenizer library necessary for your checkout page. Make sure to use this exact value for attribute integrity in the <script> HTML tag when loading the libary.
Add iframe to checkout page
Pass the hostedTokenizationUrl from your backend to your checkout page containing this script.
Create a Tokenizer instance. The constructor takes three arguments:
- The hostedTokenizationUrl retrieved in the previous step.
- The id of the DOM element inside which the iframe will be loaded.
- An optional object to further customise the behaviour of the tokenisation page. See chapter "Send additional tokenizer arguments" below for more details.
var tokenizer = new Tokenizer(hostedTokenizationUrl, 'div-hosted-tokenization', {hideCardholderName: false });
Now invoke the initialize() function. This automatically adds an <iframe> to the <div id="div-hosted-tokenization"></div> element. The <iframe> opens the hostedTokenizationUrl automatically.
tokenizer.initialize().then(() => {
    // Do work after initialise, if any
  })
  .catch(reason => {
    // Handle iframe load error
  })
Submit & tokenise card details
Your customers enter their card details in the <iframe> on your checkout page. Our platform detects the card scheme automatically once your customers start typing in the number. This also works for co-badged cards (where applicable).
Your customers submit the card data to our platform via the Javascript <button> element, invoking the submitTokenization() function from the JavaScript code snippet. Our platform tokenises the card data and returns a hostedTokenizationId.
Mind that this <button> element is NOT part of the <iframe> itself. Therefore, you need to add it to your checkout page yourself.
Despite this, our API explorer still allows you to simulate the full payment flow. Learn how it works in the dedicated chapter.
The Hosted Tokenization Page does not accept Bancontact card numbers.
However, the Hosted Tokenization Page will detect co-badged Bancontact cards.
In these cases, the Hosted Tokenization Page accepts the card payment brand linked to the co‑badged Bancontact card.
Learn in our dedicated "Co-badging and BIN detection" guide how to combine co-badging with the Hosted Tokenization Page.
Learn in our dedicated Bancontact guide how to process transactions with stand-alone Bancontact cards.
Send CreatePayment request
You send a CreatePayment request to our platform via our Server-to-server integration method, including the card details and mandatory 3-D Secure properties. Replace sensitive card data in the card property with the hostedTokenizationId.
Process platform response
Our platform sends a response containing a merchantAction object.
It instructs you how to proceed with the payment. Based on the response, these scenarios are possible:
- 3-D Secure frictionless flow: (merchantAction.actionType=null): Your customers use a 3-D Secure enrolled card. The 3-D Secure properties in your CreatePayment request prove to be sufficient for the authentication step. We submit the transaction to the acquirer and provide the result in property statusOutput.statusCode.
- 3-D Secure challenge flow: (merchantAction.actionType="REDIRECT"): Your customers use a 3-D Secure enrolled card. They need to identify themselves as the rightful card owner. Redirect them to their issuer via the merchantAction.redirectData.redirectURL. Define a cardPaymentMethodSpecificInput.returnUrl in the initial CreatePayment request to make sure your customers are redirected to your webshop afterwards.
- No 3-D Secure authentication (merchantAction.actionType=null): Your customers use a non-3-D Secure enrolled card. We submit the transaction to the acquirer and provide the result in property statusOutput.statusCode.
Get & show transaction result
Are you migrating from legacy to GoPay?
Unlike legacy, our platform does not send e-Mail notifications for processed GoPay orders or status updates.
Use Webhooks to receive notifications about transactions status updates. Based on the result, implement a mechanism in your server to send e-Mails to your/your customers' inbox. This will allow you to customise the content, timing and selecting the status updates for which you want to send e-Mails.
Learn more about migrating legacy features to GoPay in our dedicated guide.
Depending on the scenario, getting and showing the transaction / 3-D Secure result differs:
3-D Secure frictionless flow/No 3-D Secure authentication
Your customers remain in your webshop. Adapt your webshop checkout page according to the statusOutput.statusCode as returned from the initial CreatePayment request.
3-D Secure challenge flow:
We receive the transaction / 3-D Secure result redirect your customers to your webshop. Define a cardPaymentMethodSpecificInput.returnUrl in the initial CreatePayment request for this redirection. Make sure to implement a mechanism on this returnUrl that notifies your server about this redirection. Upon receiving this notification, send a GetPaymentDetails request to get the transaction result. Use the payment.id from the initial CreatePayment request:
Adapt the returnUrl depending on the statusOutput.statusCode as returned from this GetPaymentDetails request.
Learn in our dedicated Status guide more about the properties from the response, their meaning and how to proceed appropriately depending on the transactions' status.
You can also receive the transaction / 3-D Secure result via webhooks. Mind that webhooks are asynchronous events. Therefore, they are not suitable for handling real-time events for the checkout process.
Flows
Find a full transaction flow involving every party and (optional) steps in this overview:
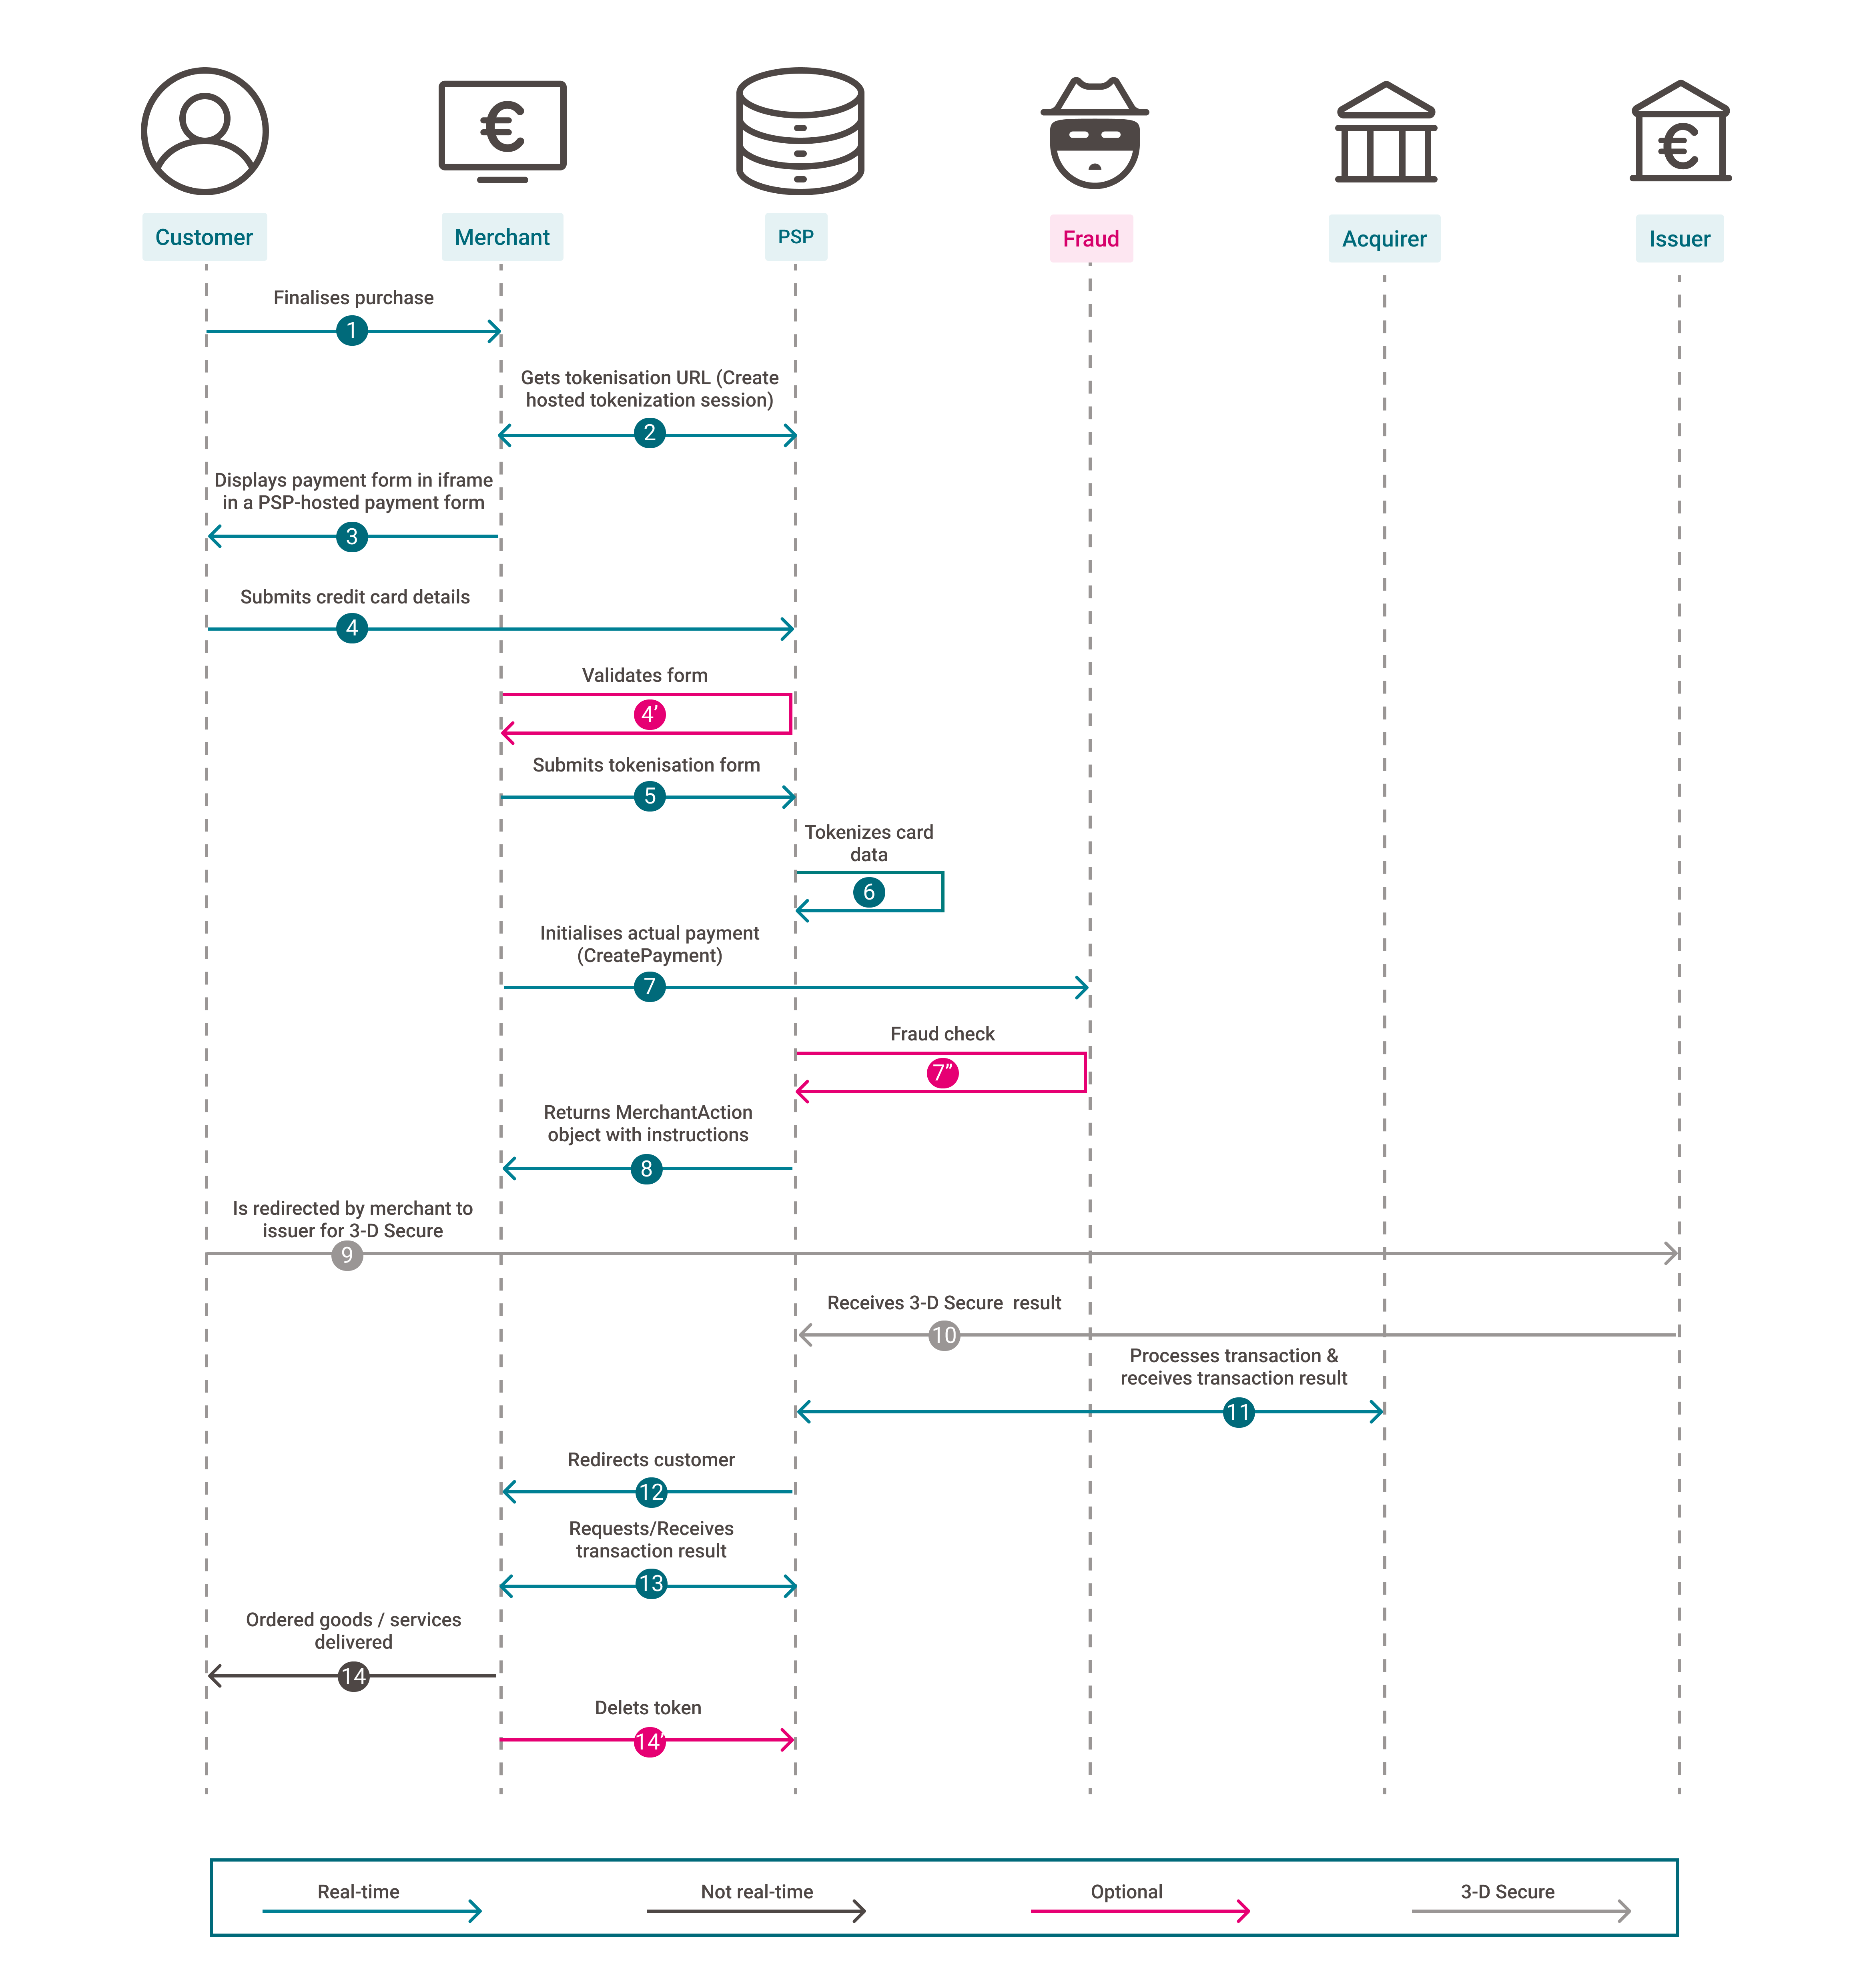
- Your customers go to your check-out page and finalise the purchase.
- You send a CreateHostedTokenization request to our platform. Our platform returns a hostedTokenizationURL.
- You add the <iframe> hosting the payment mask to your check-out page.
- Your customers enter their card details in the <iframe>.
4'(optional). You use our validation function to check whether the cardholder has filled in the form correctly. - Your customers submit the card data to our platform.
- Our platform tokenises the card data and returns a hostedTokenizationId.
- You send a CreatePayment request to our to our platform using our Server-to-server integration method, including the mandatory 3-D Secure properties.
7'(optional).We perform a fraud prevention check. - Our platform sends a response containing a merchantAction object, instructing you how to proceed. These scenarios are possible:
a) 3-D Secure frictionless flow (merchantAction.actionType=null). The flow continues at step 14).
b) 3-D Secure challenge flow (merchantAction.actionType="REDIRECT"). The flow continues at step 9).
c) No 3-D Secure authentication (merchantAction.actionType=null). The flow continues at step 14). - You redirect the customer to her/his issuing bank for 3-D Secure authentication. The customer identifies herself/himself.
- Our platform receives the 3-D Secure authentication result from the issuer. Based on the result, two scenarios are possible:
a) If the identification was unsuccessful, we redirect your customers to your returnURL, ending the flow. You request/show the transaction result as described in step 13.
b) If the identification was successful, the flow continues at step 11. - We process the transaction and receive the result from the acquirer.
- We redirect your customer to your returnURL.
- You request the transaction result from our platform and show it on your returnURL/in your webshop.
- If the transaction was successful, you can deliver the goods / services.
14'(optional). Delete the token if you do not plan it to use it for recurring payments or if your customer did not agree to store the credentials.
Flow simulation in our API explorer
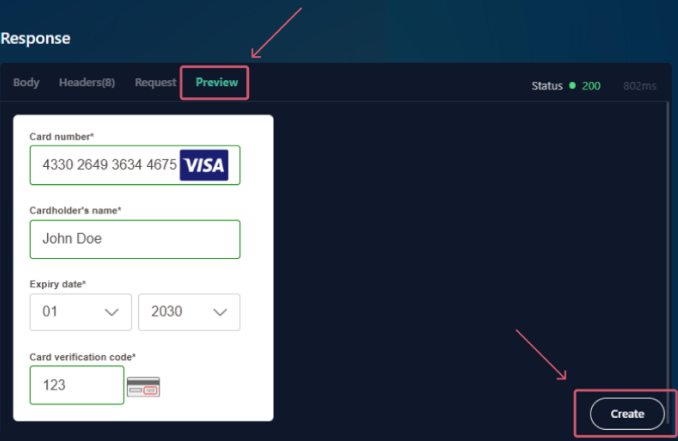
As described in the "Build checkout page & set up Content Security Policy" chapter, <button> element to submit the card data in step 5 of the payment flow is not part of the <iframe> itself. Therefore, you need to add it to your checkout page yourself. This also applies when submitting a CreateHostedTokenization session via our API Explorer. However, it is still possible to simulate the full flow in our API Explorer. To do so, follow these steps:
- Go to the API Explorer and select the CreateHostedTokenization endpoint.
- Click on the "Send" button to submit the request.
- Our platform provides the response in the "Response" section. In the "Response" section, select the "Preview" tab.
- Fill in the card data fields in the Hosted Tokenization Page <iframe>. Click on the "Create" button (which acts as the aforementioned <button> element).
- The API explorer redirects you to the API Explorer CreatePayment with hostedTokenizationId endpoint interface, prefilling the JSON with the hostedTokenizationId from your CreateHostedTokenization request.
- Click on "Send" to submit the payment request as described in step 7 of the payment flow.
Wir haben unsere Hosted Tokenization Page so gestaltet, dass Sie sie so weit wie möglich nach eigenen Wünschen anpassen können. Sehen Sie sich diese Möglichkeiten an:
iframe-Vorlage erstellen
Das Herzstück dieser Lösung ist ein iframe, der das Zahlungsformular enthält. Wir haben ihn so gestaltet, dass Sie Folgendes können:
- Seine verschiedenen HTML-Elemente nach Ihren Wünschen anpassen.
- Ihre eigene .css-/Bilddateien verwenden, um das Zahlungsformular noch weiter zu verändern.
Our platform allows you to upload multiple template files. Use the one of your choice by populating property variant with the file name in the CreateHostedTokenization request.
Visuelle Gestaltung anpassen
Sie können einen CSS-Stil auf die Abmessungen des iframe anwenden, damit er sich noch nahtloser in Ihren Webshop einfügt. Dazu fügen Sie diesen Abschnitt in Ihre .css-Datei ein:
iframe[name=htpIframe0] {
    border: none;
    width: 800px;
}
Name des Karteninhabers verwalten
Mit unserer API können Sie Feld mit dem Namen des Karteninhabers im iframe wahlweise anzeigen oder ausblenden.
Dazu übergeben Sie im Tokenizer-Constructor entweder den booleschen Wert hideCardholderName: true oder den booleschen Wert hideCardholderName: false:
var tokenizer = new Tokenizer(hostedTokenizationUrl, 'div-hosted-tokenization', { hideCardholderName: false });- Wenn nichts angegeben ist, setzt unsere Plattform standardmäßig hideCardholderName: true
- Der Name des Karteninhabers muss angegeben werden. Wenn Sie den Namen in Ihrer Webshop-Umgebung abrufen möchten, müssen Sie ihn im Formular senden:
tokenizer.useCardholderName("Wile E. Coyote")
tokenizer.submitTokenization().then((result) => { ... })
Weitere Tokenizer-Argumente senden
Der in Schritt 3 beschriebene Tokenizer-Aufruf kann neben hideCardholderName weitere Argumente haben. Fügen Sie eines oder mehrere dieser Argumente zu Ihrer Anfrage hinzu, um den Zahlungsablauf je nach Bedarf anzupassen:
| Argument | Beschreibung |
|---|---|
| hideCardholderName | Siehe das entsprechende Kapitel |
| hideTokenFields | Boolesch Auf true setzen, wenn die iframe-Felder (Kartennummer, Name des Karteninhabers und Ablaufdatum) mit den in einem Token gespeicherten Daten für eine wiederkehrende Zahlung vorausgefüllt werden sollen |
| validationCallback | |
| paymentProductUpdatedCallback | Callback-Funktion Zum Erkennen der verwendeten Kartenmarke, wenn die Kartennummer in das Zahlungsformular eingegeben wird: |
Unsere Lösung Hosted Tokenization Page bietet viele weitere Möglichkeiten. Hier erfahren Sie alles über die verfügbaren Funktionen.
Vorhandenes Token verwenden
Auf unserer Plattform können Sie Kreditkartendaten Ihrer Kunden dauerhaft für wiederkehrende Zahlungen oder für Direktkäufe speichern und mit diesen Daten das Zahlungsformular vorausfüllen. Das macht die Zahlung für Ihre Kunden noch reibungsloser und verbessert Ihre Konversionsrate!
- Durch Verwendung eines vorhandenen Tokens für Direktkäufe können Sie die Kreditkartennummer und das Ablaufdatum zur Vereinfachung für Ihre Kunden vorausfüllen.
- Wegen von SCA müssen Ihre Kunden möglicherweise weiterhin ihren CVC eingeben und/oder eine 3-D Secure-Authentifizierungsprüfung durchführen. Unser Zahlungsformular zeigt automatisch die Pflichtfelder zum Ausfüllen an.
Da das Token zum Zeitpunkt der Transaktionsanfrage bereits vorhanden ist, ist der Zahlungsablauf anders:
- Schritt 1: Weisen Sie unsere Plattform an, dass Sie ein vorhandenes Token verwenden möchten. Dazu ändern Sie die Anfrage createHostedTokenizationRequest, indem Sie die Eigenschaft tokens hinzufügen:
-
Eine erfolgreiche Anfrage sieht so aus:
Status: 200 OK
{
    "hostedTokenizationId": "2f4d08d6ddfc411e944e81c54d824a99",
    "invalidTokens": [ "86a44668-5d0f-4e3f-a597-2aa0a4d03fe5" ],
    "hostedTokenizationUrl": "https://payment.preprod.direct.worldline-solutions.com//hostedtokenization/tokenization/form/2f4d08d6ddfc411e944e81c54d824a99",
    "partialRedirectUrl": "preprod.direct.worldline-solutions.com//hostedtokenization/tokenization/form/2f4d08d6ddfc411e944e81c54d824a99"
}
- Schritt 2: Das angezeigte Formular mit den gespeicherten Kreditkartendaten vorausfüllen. Unsere Plattform bietet Ihnen dafür zwei Möglichkeiten:
1. Gleich wenn Sie das Formular anzeigen, füllen Sie es aus. Dazu fügen Sie das Token als viertes Argument zum Konstruktor tokenizer hinzu:var tokenizer = new Tokenizer(hostedTokenizationUrl, 'div-hosted-tokenization', { }, '00164fec-32b2-462e-b48b-84a27930b10c');
2. Wenn Sie das Formular anzeigen, lassen Sie es zunächst leer Lassen Sie Ihren Kunden in Ihrer Webshop-Umgebung die Wahl, ob sie mit ihrer gespeicherten Karte bezahlen möchten. Wenn ja, verwenden Sie die folgende Funktion zum Ausfüllen des Formulars:var tokenizer = new Tokenizer(hostedTokenizationUrl, 'div-hosted-tokenization', { });
...
// // Später, zum Beispiel wenn eine Benutzereingabe einen Tokenwechsel auslöst
function tokenChanged () {
tokenizer.useToken('00164fec-32b2-462e-b48b-84a27930b10c'); // Ändert das Formular, um das ausgewählte Token zu aktualisieren, und zeigt nur das CVC-Feld (falls erforderlich) an
// oder
tokenizer.useToken(); // Setzt das Formular zum Erstellen eines neuen Token zurück
}
Sie können es Ihren Kunden auch gestatten, das Token im Zahlungsformular zu aktualisieren. Durch Initialisieren des booleschen Werts hideTokenFields wie folgt können Ihre Kunden:
a) {hideTokenFields:true}: bekannte Felder (Kartennummer/Ablaufdatum) ausblenden
b) {hideTokenFields:false}: Pflichtfelder sind sichtbar und können ausgefüllt werden / bekannte Felder können geändert werden (nur Karteninhabername/Gültigkeitsdatum)
Die Anfrage sieht so aus:var tokenizer = new Tokenizer(hostedTokenizationUrl, 'div-hosted-tokenization', {hideTokenFields:true});
Validierungsstatus abfragen
Ihre übergeordnete Seite kann den Validierungsstatus des Zahlungsformulars jederzeit abrufen. Übergeben Sie eine Validierungs-Callback-Funktion, die aufgerufen wird, wenn sich der Gültigkeitsstatus des Zahlungsformulars ändert. Achten Sie darauf, dass diese Funktion einen Parameter enthält, der ein Objekt mit dem booleschen Wert valid empfängt. Dieser boolesche Wert zeigt an, ob das Formular korrekt ausgefüllt ist.
Verwenden Sie diese Information zum Aktivieren/Deaktivieren die Schaltfläche "Absenden" auf der übergeordneten Seite, wenn das Zahlungsformular korrekt/falsch ausgefüllt ist. Fügen Sie diese Funktion zu Ihrem Skript in Schritt 3 hinzu:
var tokenizer = new Tokenizer(hostedTokenizationUrl, 'div-hosted-tokenization', { validationCallback: myValidationCallback }); function myValidationCallback(result) { document.getElementById('btn-submit').disabled = !result.valid }var tokenizer = new Tokenizer(hostedTokenizationPageUrl, 'div-hosted-tokenization', { validationCallback: myValidationCallback });
function myValidationCallback(result) { document.getElementById('btn-submit').disabled = !result.valid }
Formular entfernen
Sie können das Zahlungsformular von der übergeordneten Seite entfernen. Der Aufruf dieser Funktion entfernt den iframe und seine Event-Listener:
tokenizer.destroy();tokenId statt hostedTokenizationId verwenden
Unsere Plattform bietet Ihnen die Möglichkeit, Transaktionen sowohl mit der hostedTokenizationId als auch mit der tokenId zu verarbeiten. Der Ablauf für die erste Variante ist in diesem Kapitel beschrieben. Zum Verwenden von TokenIDs müssen Sie den Ablauf wie folgt ändern:
-
Eine Zahlungsanforderung wird eingeleitet
-
Rufen Sie eine gültige Tokenisierungs-URL durch Aufruf von Create Hosted Tokenization ab
-
Fügen Sie auf Ihrer Checkout-Seite ein Stück Code ein, mit dem Sie das Tokenisierungsformular mit der gültigen Tokenisierungs-URL als iframe auf Ihrer Checkout-Seite anzeigen können
-
Ihr Kunde gibt seine Kreditkartendaten im iframe ein
-
Das Token für die eigentliche Zahlung abrufen
Stellen Sie das Ergebnis der Tokenisierung wieder her, indem Sie von Ihrem Backend aus einen GetHostedTokenization-Aufruf durchführenFür Anfragen an unsere TEST-Umgebung: https://payment.preprod.direct.worldline-solutions.com/MERCHANT_ID/hostedtokenizations/hostedTokenizationId
Für Anfragen an unsere LIVE-Umgebung: https://payment.direct.worldline-solutions.com/MERCHANT_ID/hostedtokenizations/hostedTokenizationId -
Erstellen Sie die eigentliche Zahlung mit dem Token. Senden Sie eine CreatePayment-Anfrage an unseren Server. Für die Anfrage können Sie das folgende Code-Beispiel verwenden:
-
Sie leiten Ihre Kunden für eine 3-D Secure-Prüfung an ihre ausstellende Bank weiter. Der / die Karteninhaber/in identifiziert sich
-
Unser System erhält das Ergebnis vom Kreditkartenherausgeber.
-
Wir senden die eigentliche Finanztransaktion zur Verarbeitung an den Acquirer
-
Wir leiten Ihren Kunden um zu Ihrer ReturnUrl
-
Sie fragen das Ergebnis der Transaktion via GetPayment bei unserer Plattform an oder Sie erhalten das Ergebnis via Webhooks.
-
Wenn die Transaktion erfolgreich verlaufen ist, können Sie die Güter / Dienstleistungen ausliefern.
12' (optional): Das Token löschen
Datenschutzrichtlinie abrufen
Mit GetPrivacyPolicy können Sie den rechtlichen Rahmen für jede von Ihnen angebotene Zahlungsmethode abrufen, so dass Sie sich nicht um die Erstellung und Pflege Ihrer eigenen Datenschutzrichtlinie kümmern müssen.
Pre-select available card schemes
You can exclude or preselect specific card schemes from the iframe using the properties from object paymentProductFilters in your CreateHostedTokenization request:
- exclude.products: Array of paymentProductIds to be filtered out
- restrictTo.products: Array of paymentProductIds that should be available
Find the value for the individual paymentProductIds in column "Payment Product-ID" in this overview.
- Find detailed information about this object and its properties in our CreateHostedTokenizationAPI.
excludewill override any value inrestrictToand thereby ensure exclusion.- If your customers enter a number from any card scheme you have made unavailable via
exclude, the payment mask will display "Card number incorrect or incompatible".
Manage Card Verification Value
Due to PCI DSS regulations, we are only allowed to store a card’s verification value (CVV) for a maximum of two hours.
For single payments via the Hosted Tokenization Page, this time span is adequate to initialise the payment. However, when processing recurring payments using permanently stored tokens, you will face the following scenario: for any subsequent payment, our platform prefills the <iframe> fields - except for the CVV code due to this regulation.
To further smooth out your customers' payment experience, our platform allows you to make the CVV check optional. This applies to both the
- Initial payment when creating the token.
- Subsequent payment when using the token.
You can achieve this by implementing the following properties in your checkout page / CreateHostedTokenization request respectively:
| Property | Description |
|---|---|
| creditCardSpecificInput.ValidationRules cvvMandatoryForNewToken cvvMandatoryForExistingToken |
cvvMandatoryForNewToken: Set to either "true" or "false" in your request to allow your customers to enter the CVV in the <iframe> payment form or not. cvvMandatoryForExistingToken: Set to either "true" or "false" in your request to allow your customers to enter the CVV in the <iframe> payment form or not. Applicable only when using existing tokens and thereby prefilling the payment form. |
| hideOptionalCvv | Tokenizer class argument used for initialising the <iframe> on your checkout page.
Set to either "true" or "false" depending on whether you want to keep/hide the "Card verification code" field in the payment form. |
When sending "false" for either cvvMandatoryForNewToken/cvvMandatoryForExistingToken property, the validation check will trigger a successful form validation event also when CVV is not added to the iframe. This allows you to continue with the payment flow by sending the actual payment request.
For CreatePayment requests sent without the hostedTokenizationId, our platform takes into account whether the CVV is mandatory for the payment method. Contact us to configure the respective payment method(s) for you in your account. To overwrite that setting per session, we strongly recommend sending the hostedTokenizationId instead of the token in your CreatePayment request.
Make sure to align with your acquirer if you want to make the CVV check optional or skip it altogether. In some cases, you might become liable for chargebacks.
Accessibility statement
Worldline is committed to making its products accessible in accordance with EU directive 2019/882 from the 17th of April 2019 Article 47 of French Law No. 2005-102 of February 11, 2005.
Read our complete accessibility statement for the Hosted Tokenization Page solution to learn about the product's compliance scope.