Salesforce Commerce Cloud
Introduction
Our Salesforce Commerce Cloud plug-in comes with regular updates and full integration support, offering a versatile out-of-the-box solution to accept online payments easily:
- Supports the following integration methods:
- Hosted Checkout Page that redirects your customers to the Direct payment page for any of our available payment methods.
- Hosted Tokenization Page that includes an iFrame in your checkout page for card payments.
- Redirect Payments that allows your customers to chose their preferred payment method directly on your checkout page by introducing single payment buttons.
- Manages multiple stores.
- Accepts payment operations (Refunds, authorisations, captures etc.) directly from Salesforce Commerce Cloud Business Manager.
Find the complete list of payment methods the plugin supports in our payment methods overview.
Keep an eye on our Release Notes to stay informed about updates and new features (i.e. payment methods, features, integration methods) we have added to this plugin!
Check out our documentation to learn how to link your store with our platform to profit from all these features!
Download from GitHub Download plugin
- Entrust a system administrator with the installation and the configuration of the plugin.
- Accordingly, the target audience of this documentation are system administrators with a profound knowledge of Salesforce Commerce Cloud / Demandware.
Account Creation
To process transactions with this plugin, you need an account on our platform.
This plugin works with both our test and live environment. A test account is a great way to get familiar with both the plugin and our platform. Once you want to go live, create a production account or contact us!
Plugin code modifications void technical support
For security and stability, Worldline does not support plugins whose code has been modified by the merchant or a third party. Plugins are provided as-is (official version). Any unauthorised modification voids support and warranty and may cause malfunctions, security gaps, or incompatibilities with PSP updates.
Installation
Install plugin
The first step to use the plugin is the installation process. Before you proceed, make sure your infrastructure meets these system requirements:
| Item | Description |
|---|---|
| Plugin package |
Download the plugin: |
| GoPay credentials |
|
| Salesforce Commerce Cloud |
Compatibility with Salesforce Commerce Cloud:
The cartridge is not compatible with SiteGenesis versions using Pipelines or Controllers. |
| PCI compliancy |
SAQ A |
Once done, follow these steps:
-
Install cartridge
Install the cartridge to your project root directory at the same level as storefront-reference-architecture. Here is an example of the folder structure:my-project/ |-- link_worldline_direct/ | |-- cartridges/ | | |-- bm_worldline_direct/ | | |-- int_worldline_direct/ | |-- documentation/ | |-- metadata/ |-- storefront-reference-architecture | |-- cartridges/ | | |-- app_storefront_base/ | | |-- modules/If you have renamed the storefront-reference-architecture folder, make sure to update the base path in package.json.
-
Install Node modules
The recommended Node version to use is 12.21.0. From the cartridge’s root directory, install Node modules using your command line:npm install -
Build code
From the cartridge’s root directory, compile the client-side assets using your command line:npm run build -
Upload code
Upload int_worldline_direct and bm_worldline_direct using Commerce Cloud UX Studio or
sgmf-scripts command line utils. -
Import metadata
To add new configuration items, import the predefined metadata by following these steps:- Open the /metadata/site_import/sites/ folder.
- Rename the yourSiteId folder to the ID of your site in the Business Manager.
- Zip the site_import folder.
- In the Business Manager, go to Administration > Site Development > Site Import & Export and import the zipped file.
After the import, attributes named WorldlineDirect[attributeName] are added to Administration > Site Development. >.
System Object Types > Site Preferences > Attribute Definitions
System Object Types > Order > Attribute Definitions
System Object Types > OrderPaymentInstrument > Attribute Definitions
System Object Types > CustomerPaymentInstrument > Attribute Definitions
Custom Object Types
The service worldline.https.direct.yourSiteId is added to Administration > Operations > Services.
Configuration
After the installation, you need to configure the plugin to link your store to our platform.
You need to enforce HTTPS in the Salesforce Commerce Cloud to be compatible with the Chrome v80 policy.
Login to the Business Manager. Set the following values in the menus and confirm by clicking "Apply" or "Save":
Set Cartridge paths
To embed an external module and link it with the Business manager, follow these steps:
-
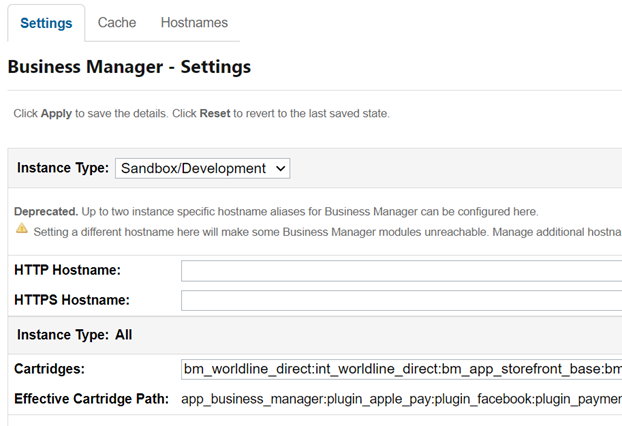
- Go to Administration > Sites > Manage Sites > [yourSite] > Settings. Enter the following in "Cartridges":
int_worldline_direct:app_storefront_base
- Go to Administration > Sites > Manage Sites > [yourSite] > Settings. Enter the following in "Cartridges":

-
- Go to Administration > Sites > Manage Sites > Manage the Business Manager site > Settings. Enter the following in front of any other existing cartridges:
bm_worldline_direct:int_worldline_direct:bm_app_storefront_base:bm_custom_plugin
- Go to Administration > Sites > Manage Sites > Manage the Business Manager site > Settings. Enter the following in front of any other existing cartridges:
Define Business Manager permissions
Manage the access rights of the module to ensure correct interaction with your Business manager and storefronts:
-
- Go to Administration > Organization > Roles & Permissions. Click on the role you want to update in the table. Go to Business Manager Modules.
- In the "Select context" pop-up, select all storefront sites that will use Worldline-Direct Payments Cartridge.
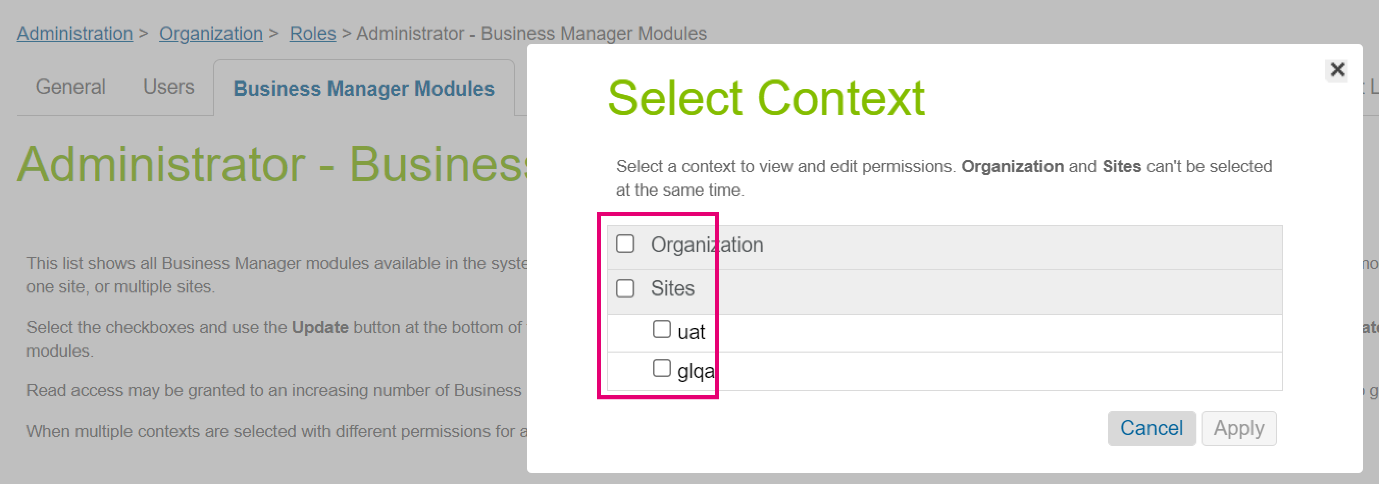
- Find Ordering module in the modules table. Assign Worldline-Direct Transactions and Worldline-Direct Subscriptions module permissions for the selected role.
Configure credentials for Test/Live environment
To target our test/live environment and make sure that your requests are legitimate, you need to configure URL endpoints and an API key/secret pair linked to a specific PSPID.
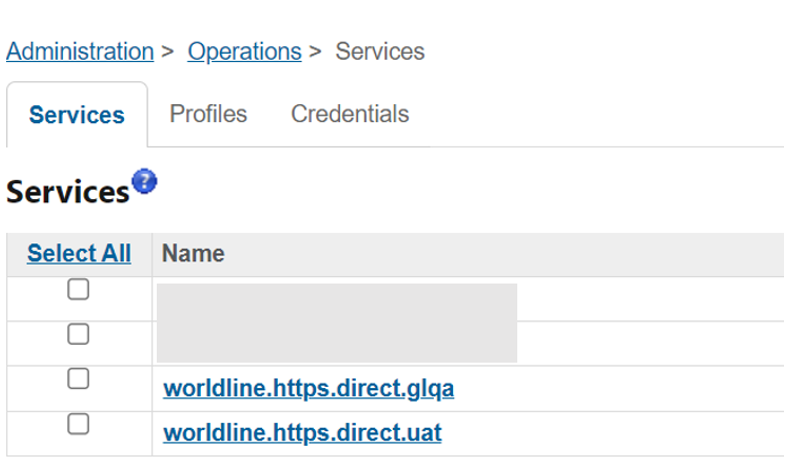
- Go to Administration > Operations > Services. Open the “Credentials” tab.
- Click on the worldline.https.direct.yourSiteId.TEST in column “Name” in the table to configure either test/live. Perform the action for both environments.
- Enter the following in the table:
| Property | Description/Actions |
|---|---|
| Name | Replace yourSiteId with the actual ID for your site. |
| URL | The test or live endpoint on our platform. Copy them from our dedicated guide. |
| User | Enter the API key of your test or live PSPID. Read our dedicated guide to learn how to generate one. |
| Password | Enter the API secret of your test or live PSPID. Read our dedicated guide to learn how to generate one. |
- Open the Services Tab. Click on worldline.https.direct.yourSiteId and enter the following in the table:
| Property | Description/Actions |
|---|---|
| Name | Replace yourSiteId with the actual ID for your site. |
| Communication Log | On test environments, the communication log could be enabled for debugging purposes. |
| Credentials | Check the updated service credentials are selected. |
Perform the action for both environments.
- Read our dedicated guides about API endpoints and authentication to get a thorough understanding about the test/live environment and API key/API secret.
- We strongly recommend configuring a separate name for both our test and live environment. This will allow you to manually switch from one environment to the other easily.
- Make sure not to mix up credential from test with live and vice versa.
Set up Worldline-Direct Payments Cartridge
Every transaction is channeled via a test/live PSPID on our platform.
- Go to Merchant tools > Site Preferences > Custom Preferences. Perform the actions for each of the custom groups as stated in the table below:
WORLDLINE_DIRECT (Shared Config)
| Property | Description/Actions |
|---|---|
| Merchant ID | Enter the PSPID to be able to connect to the Worldline platform. |
| Merchant Company Name | Enter your legal company name. |
| Operation code |
Define whether to process the transactions as authorisation mode or as direct sale. Select one of the following options:
If you authorise payments only, make sure that you capture them later. Only then will the transaction reach StatusCode=9, for which you receive funds.
|
| Checkout Type |
You can process card payments either via Hosted Tokenization Page or Hosted Checkout Page, whereas the alternative payment methods are available only via Hosted Checkout Page. |
| 3DS settings |
We strongly recommend selecting "Yes" as 3-D Secure is mandatory in some markets. This will also ensure liability shifts for transactions with successful 3-D Secure authentication. If you select "No", you may not benefit from liability shifts and may be held liable.
A customer can receive up to five consecutive exemptions, with a cumulative total of 150 EUR. The next transaction that exceeds these criteria will require Strong Customer Authentication (SCA). |
| Apply Surcharge |
Make sure that the Surcharging is activated in your Worldline account. |
|
Enable Subscriptions |
Select YES if you want the functionality to be turned ON.
The customer can cancel his subscriptions at any time from the My Account section, the same is possible for the merchants with access to the module from the business manager. |
|
Wero capture trigger |
The plugin passes this info-only field to the Worldline API to display inside the Wero portal. The field is only sent when the operation code is set to Final_Authorization. |
|
Instant bank transfers only |
Activate this option to only accept instant bank transfers from customers. |
WORLDLINE_DIRECT_HCP (Hosted Checkout Page Settings)
| Property | Description/Actions |
|---|---|
| Hosted Checkout Template | Enter your template's file name to adapt our payment page to the look and feel of your shop. Learn here how to create templates. |
| Group Cards | Enable this option to group all card payment options as a single payment method on the checkout page. |
| Session Timeout (mins) | Define the session timeout value for the Hosted Checkout Page. The default setting is 180 minutes. |
| Intersolve IDs | Enter a comma-separated list of the Intersolve ID(s) associated with your merchant account. |
| OneyCard payment option | Enter a value to specify how many instalments the payment can be split into. |
WORLDLINE_DIRECT_HTP (Hosted Tokenization Page Settings)
| Property | Description/Actions |
|---|---|
| Hosted Tokenization JS | Enter a valid tokenization URL as an iframe on your checkout page. Find it in our documentation. |
| Hosted Tokenization Template | Enter your template's file name to adapt the iframe to the look and feel of your shop. Learn how to create templates in our documentation. |
WORLDLINE_DIRECT_WEBHOOKS (Webhooks config)
| Property | Description/Actions |
|---|---|
| Webhooks Key ID | Enter the Webhooks Key ID of your test or live PSPID. |
| Webhooks Key Secret | Enter the Webhooks Key Secret of your test or live PSPID. |
WORLDLINE_DIRECT_3DS (3-D Secure config)
| Property | Description/Actions |
|---|---|
| Enable 3DS |
Enable or disable 3-D Secure. We strongly recommend selecting "Yes" as 3-D Secure is mandatory in some markets. This will also ensure liability shifts for transactions with successful 3-D Secure authentication. If you select "No", you may not benefit from liability shifts and may be held liable. |
| Enable mandatory 3DS |
Define whether to enforce Strong Customer Authentication (SCA) regardless of any possible exemptions. |
| Exemption type |
Define the type of exemption you want to offer. The available options are No challenge request (Default), Low-value, and Transaction-risk-analysis. |
| Exemption limit (No challenge request) |
Request the issuer to skip 3-D Secure for baskets up to 100 EUR. |
| Exemption limit (Low-value) |
Request exemptions for baskets up to 30 EUR. |
| Exemption limit (Transaction-risk-analysis) |
Request exemptions based on a risk analysis performed by the acquirer or the issuer, for baskets up to 100 EUR. |
Configure payment methods and integration methods
We categorise payment methods into two different clusters:
- Card payments
- Alternative payment methods
You can process card payments either via Hosted Tokenization Page or Hosted Checkout Page, whereas the alternative payment methods are available only via Hosted Checkout Page.
Follow these steps to make your choice:
- Go to Merchant tools > Ordering > Payment methods. Click on the relevant payment method. Make sure to select YES for enabled. Perform the actions as stated in the table:
| ID value | Description/Actions |
|---|---|
| WORLDLINE_DIRECT_CARD | Mapped to all card-based payment methods You can offer these to your customers in two ways:
Bancontact is available only on Hosted Checkout Page in QR code mode. |
| WORLDLINE_DIRECT_REDIRECT |
Mapped to all alternative payment methods (digital wallets, mobile payment methods, gift cards etc.). Upon selection of the brand, the plugin redirects your customers to our Hosted Checkout Page or to the third-party provider for entering the payment credentials. Only option ”(2) Hosted Checkout Page” is available for these payment methods. |
| WORLDLINE_DIRECT_DIRECTDEBIT | Mapped to SEPA Direct Debit |
| WORLDINE_DIRECT_CREDIT_REDIRECT |
Mapped to all credit redirect payment methods |
You can also fetch, view or hide, customise and sort all available payment methods on your Worldline account into the Business Manager. Navigate to Merchant tools > Ordering > Worldline-Direct Payment Products to see all payment methods available on your Worldline account. Refresh the list whenever you activate new payment methods on your account to update it. From this page, you can also hide payment methods if you do not want them to be available on the checkout page.
- For fetching the latest payment methods, please click the button "Fetch payment products from Worldline" and repeat the process when new payment methods are added to your Worldline account.
- You can also customise the payment product logo, name and order for each payment product. Please click on the "Edit" option against the payment product and customise as per the requirement.
Additional configurations
1. Mealvouchers
Our plugin supports the Mealvouchers payment method. To make it available, the cartridge adds a custom attribute to the Product object: Mealvouchers product type, with these values:
- FoodAndDrink - Food and beverage items eligible for meal vouchers
- HomeAndGarden - Home and garden items, typically eligible for eco-cheques
- GiftAndFlowers - Gift and flower items potentially eligible for eco-cheques and another voucher type (Cheques Cadeau)
Configure this field per product by including it in your product feed to Salesforce Commerce Cloud or by editing products manually in Business Manager.
2. Subscriptions
The Worldline-Direct Subscriptions option allows the customer to order a specific set of products from the online store at regular intervals. The intervals can be managed through the plugin.
This feature is available only for registered customers. Please follow the following steps to activate it:
- Activate Subscriptions through Merchant tools > Site Preferences > Custom Preferences.
- Go to Administration > Operations and open the Credentials tab to configure the service credentials. Open worldline.httpform.ocapi and edit:
- URL: add the URL to your site/instance
- User: enter your API key ID.
- Password: enter your API key secret.
- Click Apply.
- Configure services by navigating to Services tab.
- Select httpform.ocapi credentials.
- Select a profile for the OCAPI request (create one if none is present) and apply.
Configure webhooks
The plugin uses webhooks to get the current status of your transactions from our platform. This way, your store database is always up to date.
- Configure a WebhooksKey, WebhooksKeySecret and Endpoint URLs in your PSPID as described in our dedicated guide. Make sure to use the following formula for your endpoint URLs:
https://{domain}/on/demandware.store/Sites-{yourSiteId}-Site/{locale}/WorldlineDirect-Webhooks - Go to Merchant tools > Site Preferences > Custom preferences. Click on "WORLDLINE_DIRECT_WEBHOOKS" in column "ID". Perform the actions as stated in the table:
| ID value | Description/Actions |
|---|---|
| Webhooks Key ID |
Enter the webhooks Key ID of your test or live PSPID from the previous step. |
| Webhooks Key Secret | Enter the Webhooks Key Secret of your test or live PSPID from the previous step. |
- Go to Administration > Operations > Jobs. Click on “WorldlineProcessWebhooks” in the list. Go to Job Step to set the scope to your site. Configure the schedule for the job based on your needs.
Depending on your business volume for real-time transaction processing, we recommend setting the job schedule between 1 and 5 minutes. The default value for job schedules is 5 minutes.
Find a thorough overview on possible webhook events in our dedicated documentation.
Test connection
Once you have completed all the steps, verify the configuration by establishing a test connection between the plugin and our platform:
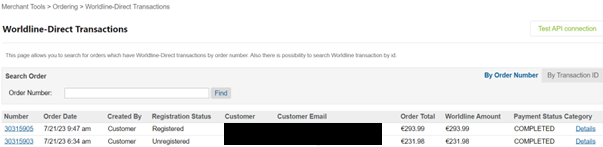
- Go to Merchant Tools > Ordering > Worldline-Direct Transactions. Click on the “Test API connection” button. Check that the appearing dialogue box states “Connection to the Worldline-Direct API succeeded”.

Manage payments
We have designed the plugin to follow-up on your orders automatically and autonomously, freeing you from the administration involved. Learn here how to use our plugin effectively which could help your business to thrive!
Follow-up on orders Check payment status / Process unconfirmed orders
To make sure
- your platform registers successful payments (StatusCode=5 or 9 and Status=”PAYMENT_CREATED”) as such and not as unfinished (because of a failed redirection of your customers to the Salesforce Commerce Cloud website.
- authorised transactions are finalised by a capture (If you choose Operation Code: Authorisation during the initial order).
the plugin implements the “Check payment status job”. Follow these steps to make them work:
- Modify property cancelUnconfirmedOrderAfterHours to the desired number of hours after which the plugin cancels an order in a pending status.
- Check out how to capture authorisations automatically or manually.
Capture authorisation automatically
If you choose to authorise transactions only during the initial order, our plugin will capture them for you at a later point. You can define the intervals and the timing for the captures based on your business requirements.
Go to Administration > Jobs > WorldlineCaptureAuthorizedPayments > Schedule and History. Perform the actions as stated in the table for the respective capture mode:
| Capture mode | Description/Actions |
|---|---|
| Capture authorisations several times a day |
|
| Capture payments at the end of the day |
|
The timing of the captures depends on the time zone you have configured in the Business Manager. Check this on the bottom of your browser.
Perform maintenance operations
Captures, refunds and cancellations of authorisations are standard processes (also known as maintenance operations) in your everyday business logic. Learn here how to perform these operations in the Business manager:
Go to Merchant Tools > Ordering > Worldline-Direct Transactions. Look up the transaction in question and click on “Details” in column “Category”. The dialogue box shows the possible actions you can perform on a transaction. Perform the action as stated in the table to perform the respective maintenance operations.
| Maintenance operations | Description/Actions |
|---|---|
| Capture |
Capture authorised transactions (StatusCode=5 / Status=PENDING_CAPTURE) to effectively receive the funds for the order:
If you want our plugin to capture transactions automatically, follow these instructions. Note: Payment methods like Twint only allows one capture per transaction. |

| Maintenance operations | Description/Actions |
|---|---|
| Cancellations |
Cancel authorised transactions (StatusCode=5 / Status=PENDING_CAPTURE)
|
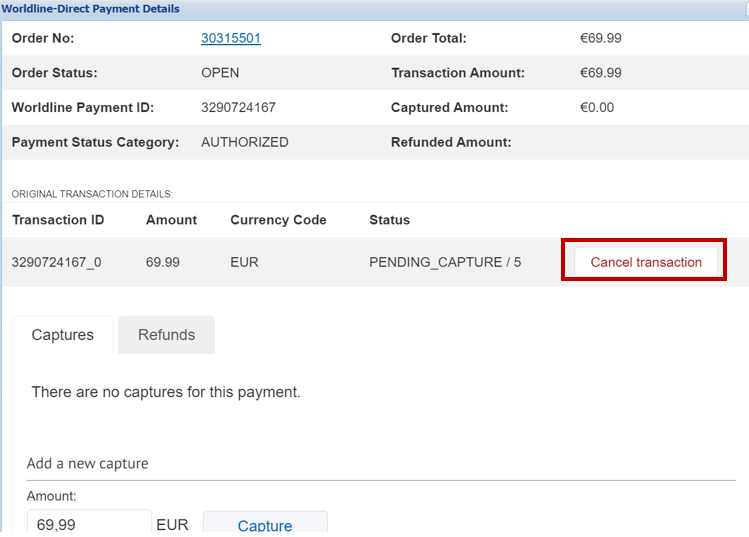
| Maintenance operations | Description/Actions |
|---|---|
| Refunds |
Reimburse your customers for captured transactions (StatusCode=9 / Status=COMPLETED)
|
Subscriptions
Managing subscription orders has never been this easy! Just like one-off payments, subscription orders can be managed through the business manager.
- Go to Merchant Tools > Ordering > Worldline-Direct Subscriptions to access the module. This page lists the subscription orders with details.
- Click on the order you want to check the subscription details like period and frequency. You will be able to block/unblock or cancel a subscription through the same page.
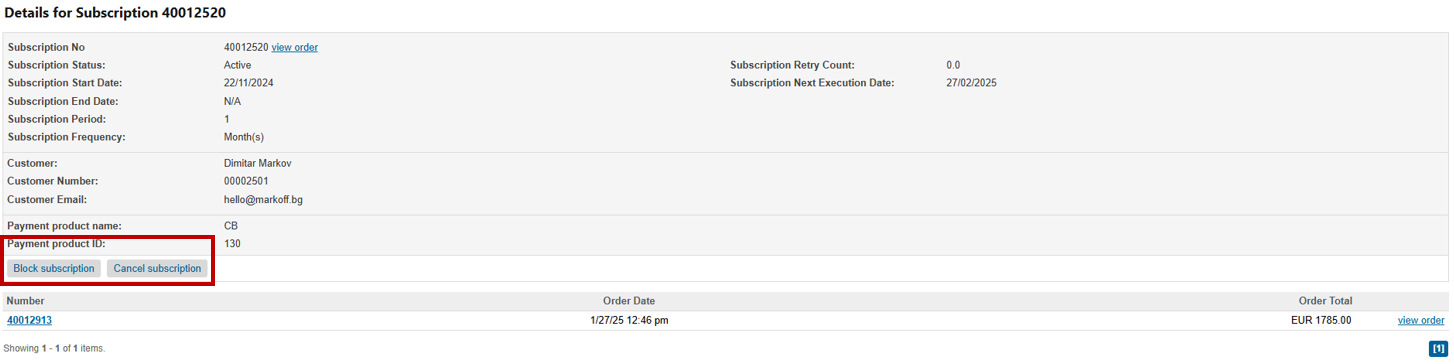
Please note that Block Subscription is a temporary status in case of missing stock or payment issues. The status is reversible and can be changed manually once the issues are resolved.
Perform test transactions
Use our platform's test environment to make sure your plugin works as intended. We offer test data sets on our dedicated Test cases page. Target our test environment as described in the "Configure Plugin" section.
Have a new feature request?
Navigate to Merchant Tools > Ordering > Worldline-Direct Transactions. You will find the option at the bottom of the page.
Make sure to switch to the LIVE environment as soon as you have finalised your tests.