Hosted Tokenization Page

- Delegate handling sensitive data to us for PCI compliancy
- Flexible and easy visual adaptation & customisation
- Ease future purchases and Card On File payments for your customers!
Get started
To process transactions on our platform with this solution, make sure that
- You have an account on our platform
- At least one of the following payment methods is activated in the Merchant Portal via Business > Payment methods:
American ExpressCartes BancairesDankortDinersJCBMaestroMasterCardUPI - UnionPay InternationalVisa
Are you using the Back Office?
You can check the payment method’s activation status via Configuration > PM activation. - You have configured your API Key and API Secret in your account
- Your server can process server-to-server request via our RESTful API. Using one of our Server SDKs will greatly ease this task
Are you all set? Then learn how to use our Hosted Tokenization Page in the next chapter!
How it works
Before you process live transactions, use our test environment. Get to know our solution without costs or any commitments involved! Once you want to go live, check out here how to get a production account or contact us!
To qualify for SAQ-A for this integration method, you need to comply with the eligibility criteria. Refer to the PCI Security Standards Council’s library for a full overview.
The Hosted Tokenization Page works only in conjunction with the Server-to-server integration method which is an indispensable step in the payment flow. Consequentially, this requires you to include at least the mandatory 3-D Secure properties in your payment request.
Target most up-to-date API base URL
We encourage you to always target the most up-to-date API base URL when sending requests to our platform. Have a look at our dedicated guide for a full overview.
To allow you a smooth transition, previous API base URLs remain available until further notice.
Ways to integrate
1Use our SDKs
Use our Server SDKs to seamlessly connect your server environment to our platform's Server API. These SDKs simplify the API's functionality with easy-to-use platform-specific objects.
2Use our plugins
Our Plugins provide a seamless link between your webshop and our platform. By effectively wrapping our RESTful API, these plugins save you time on writing code and make integration quick and easy.
Integration steps
Your customers have to provide their credit card number at one point during their journey in your webshop. As a merchant, the greatest challenge is to link all steps during this journey into one seamless experience. At the same time, you need to ensure the safe transfer of your customers' data to the financial institutions handling the data.
Therefore, you can either:
- Outsource the necessary security precautions completely (by using our Hosted Checkout Page solution). However, this method has limits: Your customers will notice a redirection to an external URL - a noticeable break in the payment flow.
- Collect the sensitive data on your own (by using our Server-to-server solution). But this requires you to fulfil the highest PCI requirements - which involves a lot of effort.
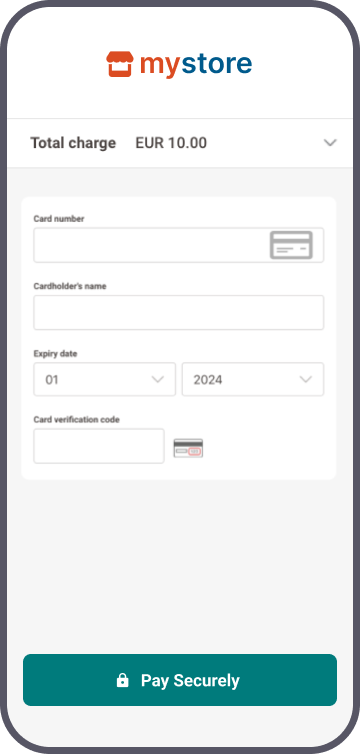
Our Hosted Tokenization Page solves this dilemma for you by combining the best of both worlds:
- Let us handle the credit card data without your customers noticing. Just add an
<iframe>to your webshop containing the payment form. As we are the host, the sensitive data come and stay at our end! We exchange the actual payment card number for a token which is not in scope for PCI. - Use this payment token for the actual payment request via the Server-to-server integration method.
- At the same time, merge it seamlessly into your webshop's look and feel. Adapt the payment form completely at will!
Our Hosted Tokenization Page works with all card payment methods.
The following chapters cover a high-level overview of a typical flow. It describes all the steps you need to follow for processing transactions. Find a detailed overview including optional steps, 3-D Secure authentication etc. in the dedicated chapter.
- Build checkout page & set up Content Security Policy
- Initialise Server SDK
- Create HostedTokenization session
- Add iframe to checkout page
- Submit & tokenise card details
- Send CreatePayment request
- Process platform response
- Get & show transaction result
Build checkout page & set up Content Security Policy
Our Hosted Tokenization Page solution requires your checkout page to implement
- Specific HTML/JavaScript elements
- Content Security Policy
Add the following HTML/JavaScript elements on your checkout page:
<div id="div-hosted-tokenization"></div>
<button onclick="submitForm()">submit</button>
<script src="https://payment.preprod.direct.worldline-solutions.com/hostedtokenization/js/client/tokenizer.min.js integrity=createHostedTokenizationResponse.sri crossorigin="anonymous" "></script> <!-- contains the methods needed for tokenization -->
<script>
  var tokenizer = new Tokenizer(hostedTokenizationUrl, 'div-hosted-tokenization', {hideCardholderName: false });

  // Invoking tokenizer.initialize() will add the <iframe> inside the previously referenced <div> element
  tokenizer.initialize().then(() => {
    // Do work after initialization, if any
  })
  .catch(reason => {
    // Handle iFrame load error
  })
  function submitForm(){ //
    tokenizer.submitTokenization().then((result) => {
    if (result.success) {
      // Proceed by storing the result.hostedTokenizationId from our platform to be used in
         subsequent steps
    } else {
      // displayErrorMessage(result.error.message);
    }
  });
}
</script>
The individual elements fulfil a specific role during the payment flow:
|
Element |
Description |
|
<script src="https://payment.preprod.direct.worldline-solutions.com/hostedtokenization/js/client/tokenizer.min.js integrity=createHostedTokenizationResponse.sri crossorigin="anonymous" "></script> |
Load the Tokenizer library for the test/live environment. Make sure to also add the following attributes to enable the subresource integrity check for the Tokenizer library:
Mind that you need to load the script from our server rather than hosting it yourself. |
|
<div id="div-hosted-tokenization"></div> |
Invoking the initialize() function adds an <iframe> to this <div> element. At the same time, the <iframe> opens the hostedTokenizationUrl you have previously requested via a CreateHostedTokenization request. The <iframe> loads a page hosting the payment mask on our side your customers use to enter their PCI-DSS-sensitive data. You can customise the elements of this <iframe> freely. Follow the instructions in this dedicated chapter to learn how to create and upload the template. |
|
<button onclick="submitForm()">submit</button> function submitForm() |
Invoking submitForm() function submits the card data from the <iframe> to our platform for tokenisation. Our platform returns a unique hostedTokenizationId for each session. Use this hostedTokenizationId to create the actual payment in a subsequent CreatePayment request. Mind that this <button> element is NOT part of the <iframe> itself. Therefore, you need to add it to your checkout page yourself. Despite this, our API explorer still allows you to simulate the full payment flow. Learn how it works in the dedicated chapter. |
|
var tokenizer |
The instance of the Tokenizer class providing all functionalities you need for the payment process, i.e.
|
Content Security Policy
If you have set up a Content Security Policy for your website, you need to whitelist our domains. This will allow loading the tokenizer file and let us capture its logs.
To do so, add the domain https://payment.preprod.direct.worldline-solutions.com/ to the script-src, connect-src and frame-src directives of your Content Security Policy definition.
Initialise Server SDK
Initiate the Server SDK by defining connection URLs, your PSPID on our platform and API Key/Secret. Read the documentation of your preferred SDK to learn more.
As our SDKs always implement the latest version of our API, you can leave out "v2" in your code as shown in the examples.
Endpoint Urls in test / live
- Endpoint URL TEST: https://payment.preprod.direct.worldline-solutions.com/{merchantId}/hostedtokenizations
- Endpoint URL LIVE: https://payment.direct.worldline-solutions.com/{merchantId}/hostedtokenizations
Replace "{merchantId}" with your test/live account on our platform. Learn more about the "merchantId" in our glossary.
If you are using our Server SDKs, your application needs to target the respective environment / integration method URL via instances of CommunicatorConfiguration/ IClient/ CreateHostedTokenizationRequest. Detailed information about the how-to are available in the following chapters, including full code samples.
When processing online transactions, keeping track of your conversion rate is paramount. We are eager to help you with this, via our MyPerformance tool or via our transaction databases our customer support team is happy to share with you.
To ensure we can provide you with the most precise conversion rate data, we highly recommend the following best practices:
- When submitting a transaction request to our platform, always send the customer email address order.customer.contactDetails.emailAddress.
- When resubmitting a transaction request to our platform for a unique order (i.e. after having received a status.statusOutput=2 during the first try), always send the same order.references.merchantReference from your first try.
Create HostedTokenization session
Your web shop application's backend sends a CreateHostedTokenization request to our platform. In the response, our platform will return a hostedTokenizationURL the following properties:
- hostedTokenizationURL: The value for attribute src of the <iframe> hosting the payment mask.
- sri: The subresource integrity value (SRI) for the Tokenizer library necessary for your checkout page. Make sure to use this exact value for attribute integrity in the <script> HTML tag when loading the libary.
Add iframe to checkout page
Pass the hostedTokenizationUrl from your backend to your checkout page containing this script.
Create a Tokenizer instance. The constructor takes three arguments:
- The hostedTokenizationUrl retrieved in the previous step.
- The id of the DOM element inside which the iframe will be loaded.
- An optional object to further customise the behaviour of the tokenisation page. See chapter "Send additional tokenizer arguments" below for more details.
var tokenizer = new Tokenizer(hostedTokenizationUrl, 'div-hosted-tokenization', {hideCardholderName: false });
Now invoke the initialize() function. This automatically adds an <iframe> to the <div id="div-hosted-tokenization"></div> element. The <iframe> opens the hostedTokenizationUrl automatically.
tokenizer.initialize().then(() => {
    // Do work after initialise, if any
  })
  .catch(reason => {
    // Handle iframe load error
  })
Submit & tokenise card details
Your customers enter their card details in the <iframe> on your checkout page. Our platform detects the card scheme automatically once your customers start typing in the number. This also works for co-badged cards (where applicable).
Your customers submit the card data to our platform via the Javascript <button> element, invoking the submitTokenization() function from the JavaScript code snippet. Our platform tokenises the card data and returns a hostedTokenizationId.
Mind that this <button> element is NOT part of the <iframe> itself. Therefore, you need to add it to your checkout page yourself.
Despite this, our API explorer still allows you to simulate the full payment flow. Learn how it works in the dedicated chapter.
The Hosted Tokenization Page does not accept Bancontact card numbers.
However, the Hosted Tokenization Page will detect co-badged Bancontact cards.
In these cases, the Hosted Tokenization Page accepts the card payment brand linked to the co‑badged Bancontact card.
Learn in our dedicated "Co-badging and BIN detection" guide how to combine co-badging with the Hosted Tokenization Page.
Learn in our dedicated Bancontact guide how to process transactions with stand-alone Bancontact cards.
Send CreatePayment request
You send a CreatePayment request to our platform via our Server-to-server integration method, including the card details and mandatory 3-D Secure properties. Replace sensitive card data in the card property with the hostedTokenizationId.
Process platform response
Our platform sends a response containing a merchantAction object.
It instructs you how to proceed with the payment. Based on the response, these scenarios are possible:
- 3-D Secure frictionless flow: (merchantAction.actionType=null): Your customers use a 3-D Secure enrolled card. The 3-D Secure properties in your CreatePayment request prove to be sufficient for the authentication step. We submit the transaction to the acquirer and provide the result in property statusOutput.statusCode.
- 3-D Secure challenge flow: (merchantAction.actionType="REDIRECT"): Your customers use a 3-D Secure enrolled card. They need to identify themselves as the rightful card owner. Redirect them to their issuer via the merchantAction.redirectData.redirectURL. Define a cardPaymentMethodSpecificInput.returnUrl in the initial CreatePayment request to make sure your customers are redirected to your webshop afterwards.
- No 3-D Secure authentication (merchantAction.actionType=null): Your customers use a non-3-D Secure enrolled card. We submit the transaction to the acquirer and provide the result in property statusOutput.statusCode.
Get & show transaction result
Are you migrating from legacy to GoPay?
Unlike legacy, our platform does not send e-Mail notifications for processed GoPay orders or status updates.
Use Webhooks to receive notifications about transactions status updates. Based on the result, implement a mechanism in your server to send e-Mails to your/your customers' inbox. This will allow you to customise the content, timing and selecting the status updates for which you want to send e-Mails.
Learn more about migrating legacy features to GoPay in our dedicated guide.
Depending on the scenario, getting and showing the transaction / 3-D Secure result differs:
3-D Secure frictionless flow/No 3-D Secure authentication
Your customers remain in your webshop. Adapt your webshop checkout page according to the statusOutput.statusCode as returned from the initial CreatePayment request.
3-D Secure challenge flow:
We receive the transaction / 3-D Secure result redirect your customers to your webshop. Define a cardPaymentMethodSpecificInput.returnUrl in the initial CreatePayment request for this redirection. Make sure to implement a mechanism on this returnUrl that notifies your server about this redirection. Upon receiving this notification, send a GetPaymentDetails request to get the transaction result. Use the payment.id from the initial CreatePayment request:
Adapt the returnUrl depending on the statusOutput.statusCode as returned from this GetPaymentDetails request.
Learn in our dedicated Status guide more about the properties from the response, their meaning and how to proceed appropriately depending on the transactions' status.
You can also receive the transaction / 3-D Secure result via webhooks. Mind that webhooks are asynchronous events. Therefore, they are not suitable for handling real-time events for the checkout process.
Flows
Find a full transaction flow involving every party and (optional) steps in this overview:
- Your customers go to your check-out page and finalise the purchase.
- You send a CreateHostedTokenization request to our platform. Our platform returns a hostedTokenizationURL.
- You add the <iframe> hosting the payment mask to your check-out page.
- Your customers enter their card details in the <iframe>.
4'(optional). You use our validation function to check whether the cardholder has filled in the form correctly. - Your customers submit the card data to our platform.
- Our platform tokenises the card data and returns a hostedTokenizationId.
- You send a CreatePayment request to our to our platform using our Server-to-server integration method, including the mandatory 3-D Secure properties.
7'(optional).We perform a fraud prevention check. - Our platform sends a response containing a merchantAction object, instructing you how to proceed. These scenarios are possible:
a) 3-D Secure frictionless flow (merchantAction.actionType=null). The flow continues at step 14).
b) 3-D Secure challenge flow (merchantAction.actionType="REDIRECT"). The flow continues at step 9).
c) No 3-D Secure authentication (merchantAction.actionType=null). The flow continues at step 14). - You redirect the customer to her/his issuing bank for 3-D Secure authentication. The customer identifies herself/himself.
- Our platform receives the 3-D Secure authentication result from the issuer. Based on the result, two scenarios are possible:
a) If the identification was unsuccessful, we redirect your customers to your returnURL, ending the flow. You request/show the transaction result as described in step 13.
b) If the identification was successful, the flow continues at step 11. - We process the transaction and receive the result from the acquirer.
- We redirect your customer to your returnURL.
- You request the transaction result from our platform and show it on your returnURL/in your webshop.
- If the transaction was successful, you can deliver the goods / services.
14'(optional). Delete the token if you do not plan it to use it for recurring payments or if your customer did not agree to store the credentials.
Flow simulation in our API explorer
As described in the "Build checkout page & set up Content Security Policy" chapter, <button> element to submit the card data in step 5 of the payment flow is not part of the <iframe> itself. Therefore, you need to add it to your checkout page yourself. This also applies when submitting a CreateHostedTokenization session via our API Explorer. However, it is still possible to simulate the full flow in our API Explorer. To do so, follow these steps:
- Go to the API Explorer and select the CreateHostedTokenization endpoint.
- Click on the "Send" button to submit the request.
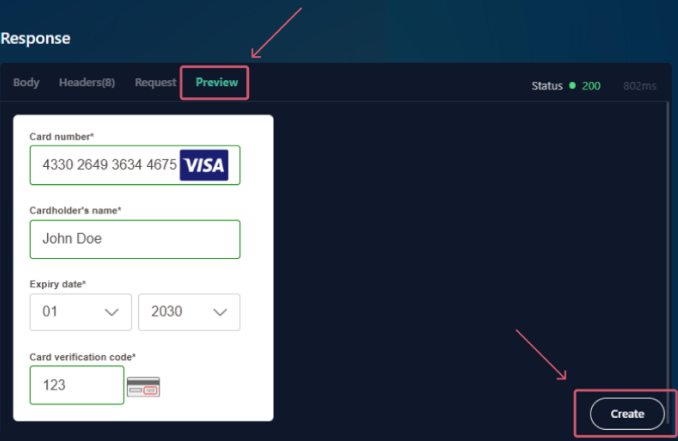
- Our platform provides the response in the "Response" section. In the "Response" section, select the "Preview" tab.
- Fill in the card data fields in the Hosted Tokenization Page <iframe>. Click on the "Create" button (which acts as the aforementioned <button> element).
- The API explorer redirects you to the API Explorer CreatePayment with hostedTokenizationId endpoint interface, prefilling the JSON with the hostedTokenizationId from your CreateHostedTokenization request.
- Click on "Send" to submit the payment request as described in step 7 of the payment flow.
Custom styling
We have designed our Hosted Tokenization Page in a way to allow you to customise it as freely as possible. Take a look at these features:
Create iframe template
The centrepiece of this solution is an iframe containing the payment form. Adapting the iframe to your corporate identity allows you to merge it seamlessly into your webshop. We have designed it in a way that allows you to:
- Adapt its various HTML elements at your liking.
- Use your own .css /image files to further modify the payment form.
Choose language version
Our Hosted Tokenization Page is available in various languages. Populate locale to display it in your customers’ preferred language. The value is a combination language and country:
{
    "locale":"en-EN",
    /* other properties omitted */
}
We support the following languages:
| Language version | locale value | Language version | locale value | |
|---|---|---|---|---|
| Arabic | ar-AE | Islandic | is-IS | |
| Bulgarian | bg-BG | Italian | it-IT | |
| Catalan | ca-ES | Japanese | ja-JP | |
| Chinese | zh-CN | Korean | ko-KR | |
| Croatian | hr-HR | Lithuanian | lt-LT | |
| Czech | cs-CZ | Latvian | lv-LV | |
| Danish | da-DK | Norwegian | no-NO | |
| Dutch / Flemish | nl-NL nl-BE |
Polish | pl-PL | |
| English UK / US | en-UK en-US |
Portuguese | pt-PT | |
| Estonian | et-EE | Romanian | ro-RO | |
| Finnish | fi-FI | Russian | ru-RU | |
| French | fr-FR | Slovak | sk-SK | |
| German Germany/Austria/Switzerland |
de-DE de-AT de-CH |
Slovenian | sl-SI | |
| Greek | el-GR | Spanish | es-ES | |
| Hebrew | he-IL | Swedish | sv-SE | |
| Hungarian | hu-HU | Turkish | tr-TR | |
| Irish | ga-IE |
Customise template
We provide two distinct approaches for implementing a customised template:
Method 1: Create a fully customised template
Create a fully customised template from scratch using our powerful Template Builder. This approach offers a high degree of customisation, allowing you to make intricate changes to the payment form's appearance and functionality.
Method 2: Adapt template from GitHub repository
You can also download and customise the necessary files directly from our GitHub repository, providing even more flexibility. It is the ideal solution to let your customers choose between local or global brands (i.e. Visa, MasterCard) if they are using a co-badged credit card.
Once you have created a template that matches your webshop's look and feel, upload it and all necessary .css / image files on our platform. To do so, follow these steps:
- Log in to the Back Office.
- Go to Configuration > Template > File Manager > Upload Template Files. Click on „File...” and select the .html (and if applicable, additional .css / image files).
- After a couple of minutes, our system will have validated the files (In “Uploaded Files”, they appear as “Validated” in column “Status”). They will then be ready to be used on the Hosted Tokenization Page.
Make sure to add the following CSS Snippet your custom template's stylesheet:
#payment-cardexpirationmonth-field-container fieldset {
	border: 0;
	margin: 0;
	padding: 0;
	min-inline-size: 0;
}
#payment-cardexpirationmonth-field-container legend.legend-visually-hidden {
	display: none;
}
Our platform allows you to upload multiple template files. Use the one of your choice by populating property variant with the file name in the CreateHostedTokenization request.
Adapt visual style
Apply CSS style to the iframe dimensions to merge it even more seamlessly into your webshop. Add this bit to your .css file accordingly:
iframe[name=htpIframe0] {
    border: none;
    width: 800px;
}
Manage cardholder name
Our API allows to either show or hide the cardholder name field in the iframe.
Pass the boolean hideCardholderName: true or the boolean hideCardholderName: false accordingly in the Tokenizer constructor:
var tokenizer = new Tokenizer(hostedTokenizationUrl, 'div-hosted-tokenization', { hideCardholderName: false });- If not specified, our platform sets hideCardholderName: true by default.
- The cardholder name is mandatory. If you choose to get the name in your webshop environment, make sure to submit it in the form:
tokenizer.useCardholderName("Wile E. Coyote")
tokenizer.submitTokenization().then((result) => { ... })
Send additional tokenizer arguments
The tokenizer call as described in step 3 takes additional arguments on top of hideCardholderName. Add any of them in your request to adapt the payment flow to your needs:
| Argument | Description |
|---|---|
| hideCardholderName | See dedicated chapter. |
| hideTokenFields |
Boolean Set to true if you want to pre-populate the iframe fields (card number, card holder name and expiry date) with the data stored in a token for a recurring payment. |
| validationCallback | |
| paymentProductUpdatedCallback |
Callback function: Detect the brand of the card used as it is entered in the payment form: |
| hideOptionalCvv | |
| storePermanently |
If you choose (not) to keep the token for upcoming subsequent payments, store or delete a token by sending true or false. |
Use additional possibilities
Our Hosted Tokenization Page solution offers many more possibilities. Learn here all about its available features.
Use existing token
Our platform allows you to store your customers' credit card data permanently for 1‑click payments. By pre‑filling the fields with the stored data, your customers' payment experience will become even smoother and improve your conversion rate.
Due to SCA, your customers might still have to enter their CVV and/or pass a 3-D Secure authentication check. Our payment form displays the mandatory fields to be filled in automatically.
As the token is already existing at the time of the transaction request, the payment flow is different:
- Step 1: Instruct our platform you want to use an existing token. To do so, modify the request createHostedTokenizationRequest by adding the property tokens:
-
A successful response looks like this:
Status: 200 OK
{
    "hostedTokenizationId": "2f4d08d6ddfc411e944e81c54d824a99",
    "invalidTokens": [ "86a44668-5d0f-4e3f-a597-2aa0a4d03fe5" ],
    "hostedTokenizationUrl": "https://payment.preprod.direct.worldline-solutions.com//hostedtokenization/tokenization/form/2f4d08d6ddfc411e944e81c54d824a99",
    "partialRedirectUrl": "preprod.direct.worldline-solutions.com//hostedtokenization/tokenization/form/2f4d08d6ddfc411e944e81c54d824a99"
}
- Step 2: Pre-fill the displayed form with the stored credit card data. Our platform offers you two ways for this:
1. Pre-fill the form right away as you display it. Achieve this by adding the token as the fourth argument to the tokenizer constructor:
var tokenizer = new Tokenizer(hostedTokenizationUrl, 'div-hosted-tokenization', { }, '00164fec-32b2-462e-b48b-84a27930b10c');
2. Leave the form empty at first as you display it. Let your customers choose in your webshop environment to pay with their stored card. If they choose to, use the following function to populate the form:
var tokenizer = new Tokenizer(hostedTokenizationUrl, 'div-hosted-tokenization', { });
...
// Later, for instance when a user input triggers a token change
function tokenChanged () {
tokenizer.useToken('00164fec-32b2-462e-b48b-84a27930b10c'); //Changes the form to update the selected token, showing only the CVV field if required
// or
tokenizer.useToken(); // Resets the form to create a new token
}
You can also allow your customers to update the token in the payment form. By initialising the boolean hideTokenFields as follows, your customers can do either.
a) {hideTokenFields:true}: Hide known fields (card number/expiry date).
b) {hideTokenFields:false}: Mandatory fields are visible to be filled in / known fields can be changed (only cardholder name/expiry date).
The request looks like this:
var tokenizer = new Tokenizer(hostedTokenizationUrl, 'div-hosted-tokenization', {hideTokenFields:true});
Get validation status
Your parent page can get the validation status of the payment form anytime. Pass a validation callback function that is called whenever the validity status of the payment form changes. Make sure this function contains a parameter that receives an object with the boolean property valid. This boolean indicates if the form is correctly filled in.
Use this information to enable/disable the submit button on the parent page if the payment form is correctly/incorrectly filled in. Add this function to your script in step 3:
var tokenizer = new Tokenizer(hostedTokenizationUrl, 'div-hosted-tokenization', { validationCallback: myValidationCallback });
function myValidationCallback(result) { document.getElementById('btn-submit').disabled = !result.valid }
Remove form
You can remove the payment form from the parent page. Calling this function removes the iframe and its event listeners:
tokenizer.destroy();Use tokenId instead of hostedTokenizationId
Our platform allows you to process transactions with both the hostedTokenizationId and the tokenId. The flow for the former is described in this chapter. Using TokenIDs requires you to modify the flow as follows:
-
A payment request is initiated.
-
Get a valid tokenization URL by a Create Hosted Tokenization call.
-
Add a code snippet to your checkout page, allowing you to display the tokenization form with the valid tokenization URL as an iframe on your check-out page.
-
Your customer enters her/his credit card data on in the iframe.
-
Get the token for the actual payment.
Recover the result of the tokenization by performing a GetHostedTokenization call from your backend
Use the following code sample for the request:For requests to our TEST environment: https://payment.preprod.direct.worldline-solutions.com/MERCHANT_ID/hostedtokenizations/hostedTokenizationId
For requests to our LIVE environment: https://payment.direct.worldline-solutions.com/MERCHANT_ID/hostedtokenizations/hostedTokenizationId -
Create the actual payment with the token. Send a CreatePayment request to our server. Use the following code sample for the request:
-
You redirect your customers to their issuing bank for a 3-D Secure check. The customers identifies themselves.
-
Our system receives the result from the issuer.
-
We submit the actual financial transaction to the acquirer to process it.
-
We redirect your customer to your ReturnUrl.
-
You request the transaction result from our platform via GetPaymentDetails or receive the result via webhooks.
-
If the transaction was successful, you can deliver the goods / services
12' (optional): Delete the token.
Get privacy policy
You can use GetPrivacyPolicy to get the legal framework for any payment method you offer, relieving you from the effort of providing and maintaining your own privacy policy.
Pre-select available card schemes
You can exclude or preselect specific card schemes from the iframe using the properties from object paymentProductFilters in your CreateHostedTokenization request:
- exclude.products: Array of paymentProductIds to be filtered out
- restrictTo.products: Array of paymentProductIds that should be available
Find the value for the individual paymentProductIds in column "Payment product id" in this overview.
- Find detailed information about this object and its properties in our CreateHostedTokenizationAPI.
excludewill override any value inrestrictToand thereby ensure exclusion.- If your customers enter a number from any card scheme you have made unavailable via
exclude, the payment mask will display "Card number incorrect or incompatible".
Manage Card Verification Value
Due to PCI DSS regulations, we are only allowed to store a card’s verification value (CVV) for a maximum of two hours.
For single payments via the Hosted Tokenization Page, this time span is adequate to initialise the payment. However, when processing recurring payments using permanently stored tokens, you will face the following scenario: for any subsequent payment, our platform prefills the <iframe> fields - except for the CVV code due to this regulation.
To further smooth out your customers' payment experience, our platform allows you to make the CVV check optional. This applies to both the
- Initial payment when creating the token.
- Subsequent payment when using the token.
You can achieve this by implementing the following properties in your checkout page / CreateHostedTokenization request respectively:
| Property | Description |
|---|---|
| creditCardSpecificInput.ValidationRules cvvMandatoryForNewToken cvvMandatoryForExistingToken |
cvvMandatoryForNewToken: Set to either "true" or "false" in your request to allow your customers to enter the CVV in the <iframe> payment form or not. cvvMandatoryForExistingToken: Set to either "true" or "false" in your request to allow your customers to enter the CVV in the <iframe> payment form or not. Applicable only when using existing tokens and thereby prefilling the payment form. |
| hideOptionalCvv | Tokenizer class argument used for initialising the <iframe> on your checkout page.
Set to either "true" or "false" depending on whether you want to keep/hide the "Card verification code" field in the payment form. |
When sending "false" for either cvvMandatoryForNewToken/cvvMandatoryForExistingToken property, the validation check will trigger a successful form validation event also when CVV is not added to the iframe. This allows you to continue with the payment flow by sending the actual payment request.
For CreatePayment requests sent without the hostedTokenizationId, our platform takes into account whether the CVV is mandatory for the payment method. Contact us to configure the respective payment method(s) for you in your account. To overwrite that setting per session, we strongly recommend sending the hostedTokenizationId instead of the token in your CreatePayment request.
Make sure to align with your acquirer if you want to make the CVV check optional or skip it altogether. In some cases, you might become liable for chargebacks.
Accessibility statement
Worldline is committed to making its products accessible in accordance with EU directive 2019/882 from the 17th of April 2019 Article 47 of French Law No. 2005-102 of February 11, 2005.
Read our complete accessibility statement for the Hosted Tokenization Page solution to learn about the product's compliance scope.